Feeding a custom C++ table model to a QML TableView instance
In this article, we’re going to show you a concrete example of how you can build a custom C++ table model from scratch, and feed it to a QML TableView instance for display. The article assumes a basic understanding of QML, so we won’t be explaining things like ListView, anchors, layouts and such. If you are rusty on these, please checkout introductory courses in our course catalog, or take a look at our Qt6 QML For Beginners book. We also assume you have Qt 6.2 or a higher version installed on your local system.
You may have already know how to use the built-in TableModel type from the Qt.labs.qmlmodels module to feed tabular data to TableView instances, all this, without ever leaving the QML territory. In most cases however, the data you feed into your views will be coming from other places such as databases, remote APIs, and files on the local file system. This means that you will need to transform the data from these sources into a format that is expected and understood by TableView. This is where C++ models come in. They provide an interface through which we can package data coming from other places, and make it understandable and consumable by TableView. This is how you’ll be using TableView in practice at least 80% of the time, by my estimate.
Note: While you will certainly need some understanding of C++ to properly understand the content of this section, I will break down the concepts into easy-to-understand chunks; up to the point where you can feed a two-dimensional data structure for display in your TableView instances. This is not a substitute for a proper time/effort investment into understanding the C++ side of Model-View programming. If anything, it’s a teaser of what you can do when you get to understand how to properly build C++ models.
Content
- The concepts
- Creating the project
- Creating the C++ class for the model
- Exposing the C++ model to QML
- Consuming the C++ model on the QML side
- Summary
The concepts
All Qt C++ model classes are built on top of a fundamental C++ type, QAbstractItemModel. It provides a common set of features needed by all Qt models. In practice, however, you will be building three kinds of models in Qt: list, table and tree models. Qt provides customizations of QAbstractItemModel to match each of these models. QAbstractListModel is used as a base when building list models, QAbstractTableModel is used as a base when building table models, and QAbstractTreeModel is used as a base when building tree models. Tree models are used to model tree-like data structures. They are coupled with a built-in view type named TreeView (or QTreeView on the C++ side) that visualizes expandable/collapsible data items as shown in the Simple Tree Model Example Application figure below.
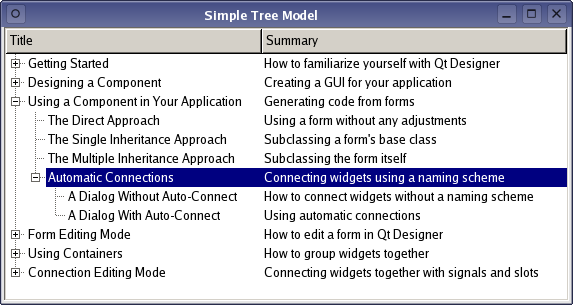
The figure is shamelessly borrowed from the Simple Tree Model Example in the official Qt documentation. To expand a data item, and to collapse an item you click on the - icon. You can see that items are arranged in some form of parent-child hierarchy. If you need to deal with data that fits this pattern, you can use TreeView (or QTreeView on the C++ side), coupled with a customized form of QAbstractTreeModel. We won’t be exploring tree models any further in the article, as we’re just interested in building a table model. But it’s good to be aware of them.
To build our custom model type, we’ll be using QAbstractTableModel as a base type. Furthermore, our type will need to implement a few methods (functions) that are expected by table view TableView types in Qt. Here is a brief description of each of them.
- int rowCount(): Views will be calling this method to know how many rows they are expected to display. The method returns an integer value.
- int columnCount(): Views will be calling this method to know how many columns they are expected to display. The method returns an integer value.
- QVariant data(): Views will be calling this method to fetch display data. This is one of the most important methods in your model. Its responsibility is to navigate the data source and expose the data in a way that’s understandable by view classes in the model-view architecture. Don’t worry if this doesn’t make sense yet. It will shortly when you see an example.
- QVariant headerData(): Views call this method when they need to display header data. Through this method, you can handle both horizontal and vertical headers.
- QHash<int, QByteArray> roleNames(): We know that, by default, Qt supports a few built-in roles. Qt::DisplayRole and Qt::EditRole are a few examples. These roles have QML equivalents; Qt::DisplayRole becomes display on the QML side, and Qt::EditRole becomes edit on the QML side. If we need to add custom roles to our model, we do that through the implementation of the roleNames() method as we’ll see shortly.
Don’t hesitate to check each of these methods from the AbstractTableModel entry in the official Qt documentation to see if you can pick up any other detail I might have missed.
Creating the project
With these basic ideas out of the way, now is a good time to try out these concepts and see them in action. Create a brand new Qt Quick project from Qt Creator, bring in the QuickControls2 module, by making sure the find_package and target_link_libraries command in your CMakeLists.txt file look as shown below:
#CMakeLists.txt
find_package(Qt6 6.5 REQUIRED COMPONENTS Quick QuickControls2)
target_link_libraries(app12-TableViewCppModel
    PRIVATE Qt6::Quick Qt6::QuickControls2
)
If at any time you’re confused about what’s in our source code, you can always reference the source code for this article on GitHub.Set up your main.cpp file to use the Material style,
//main.cpp
QQuickStyle::setStyle("Material");
and change the content of your Main.qml file to be as shown below:
//Main.qml
import QtQuick
import QtQuick.Controls
import TableModel

ApplicationWindow {
    width: 680
    height: 400
    visible: true

    HorizontalHeaderView {
        id: horizontalHeader
        anchors.left: tableViewId.left
        anchors.top: parent.top
        syncView: tableViewId
    }

    VerticalHeaderView {
        id: verticalHeader
        anchors.top: tableViewId.top
        anchors.left: parent.left
        syncView: tableViewId
    }

    TableModel{
        id: tableModelId
    }

    TableView {
        id: tableViewId
        anchors.left: verticalHeader.right
        anchors.top: horizontalHeader.bottom
        anchors.right: parent.right
        anchors.bottom: parent.bottom

        columnSpacing: 1
        rowSpacing: 1
        boundsBehavior: Flickable.StopAtBounds

        model: tableModelId

        delegate:  Label {
            text: model.tabledata
            width: 100
            padding: 12

            Rectangle {
                anchors.fill: parent
                color: "#efefef"
                z: -1
            }
        }
    }

    Button{
        text: "See the data"
        anchors.bottom: parent.bottom
        onClicked: {
            console.log(tableModelId.get_display_data(tableModelId.index(0,1)))
        }
    }
}
The line
import TableModel
is importing a custom model we’ll need to build on the C++ side. The code block
TableModel{
    id: tableModelId
}
is creating an instance of the C++ model in our Main.qml file, and the statement
console.log(tableModelId.get_display_data(tableModelId.index(0,1)))
is calling the get_display_data custom method that will allow us to read data from the model in memory. You can see that once you have your model built and exposed from the C++ side, you get to use it like we’ve used any of the built-in model types.
Creating the C++ class for the model
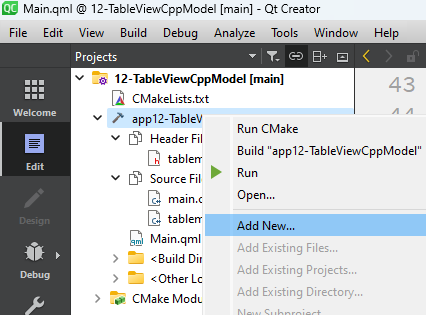
Time to create our custom TableModel type. Right-click on the target name in the Qt Creator project viewer and click Add new.
You should see a New File - Qt Creator window pop up as shown in the figure below.
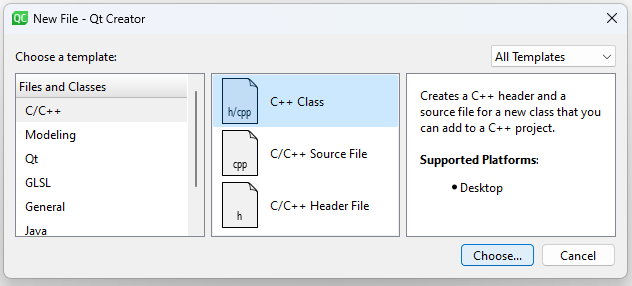
Choose C/C++ on the left and select C++ class in the middle. Click Choose. You should see the Define class window popping up as shown below.
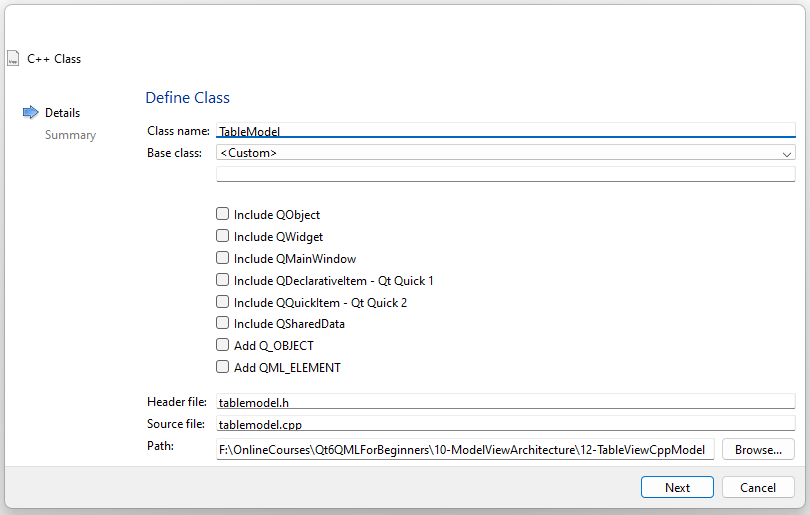
Type your class name in the Class name field and leave the Base class field to Custom. After you type in the class name, Qt Creator will automatically fill the Header file, Source file and Path fields. I usually leave these as they are, and leave all the checkboxes unchecked as shown in the figure. Click Next and you should see the Project Management window.
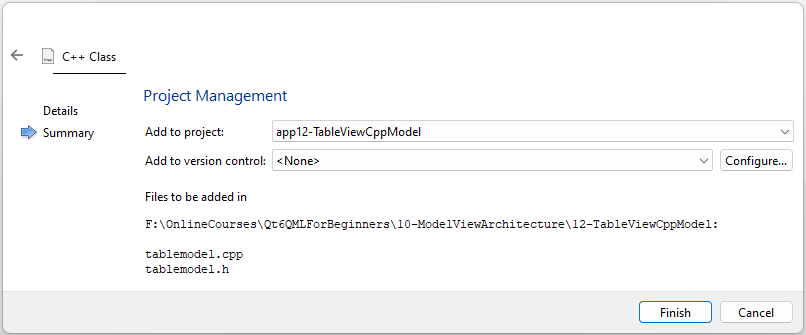
Set the Add to version control field to None. The window will also give you an overview of the files that will be created in your project. In this case, it is tablemodel.h and tablemodel.cpp. It also shows the path where the files will be added on the local drive. If you’re happy with the information, click Finish and your files will be created. Qt Creator should prompt you to add the files to your CMakeLists.txt file. You should do that as shown below, by modifying the code inside your qt_add_qml_module command.
qt_add_qml_module(app12-TableViewCppModel
    URI 12-TableViewCppModel
    VERSION 1.0
    QML_FILES Main.qml
    SOURCES
    tablemodel.h tablemodel.cpp
)
Adding the files for your C++ class under the SOURCES section in your qt_add_qml_module command makes the class directly available for use on the QML side. There’s one more thing you need to do for this to work seamlessly, but we’ll get to that later. Save the CMakeLists.txt file, and the new files should show up in the Qt Creator project viewer. Double click on tablemodel.h and change its content to be as shown below.
//tablemodel.h
#ifndef TABLEMODEL_H
#define TABLEMODEL_H

#include <QObject>
#include <QAbstractTableModel>

class TableModel : public QAbstractTableModel
{
    Q_OBJECT
    QML_ELEMENT // This makes the class available for use/instantiation on the QML side.
    enum TableRoles{
        TableDataRole = Qt::UserRole + 1,
    };
public:
    explicit TableModel(QObject *parent = nullptr);
    int rowCount(const QModelIndex & = QModelIndex()) const override;
    int columnCount(const QModelIndex & = QModelIndex()) const override;
    QVariant data(const QModelIndex &index, int role) const override;
    QVariant headerData(int section, Qt::Orientation orientation, int role) const override;
    QHash<int, QByteArray> roleNames() const override;

    Q_INVOKABLE
    QVariant get_display_data(const QModelIndex& index);

private:
    QVector<QVector<QString>> table;
};

#endif // TABLEMODEL_H
Notice that the code in the entire file is nested between the block below.
#ifndef TABLEMODEL_H
#define TABLEMODEL_H

//The code

#endif // TABLEMODEL_H
This block is an include guard. It protects our program from including the tablemodel.h file more than once. Including a .h file more than once causes a set of problems I won’t go through in this section. The lines
#include <QObject>
#include <QAbstractTableModel>
are importing the types that our custom TableModel type will depend upon. You can already recognize QAbstractTableModel. QObject brings in a set of Qt features our model will be using, one of them being signals and slots, or signals and handlers as we’ve called them in the book. The block below
class TableModel : public QAbstractTableModel
{
   //...
};
is creating our TableModel type. This is C++’s way of saying that the TableModel type will be using QAbstractTableModel as a foundation. Notice that the block opens with a { and closes with a } followed by a semicolon. Q_OBJECT is a Qt pre-defined macro that enables some QObject features for our specific type. For example, it’s because of it that we’ll have access to signals and slots inside our custom TableModel. The QML_ELEMENT macro tells Qt that this class should be available for use on the QML side. This set up is enough, for the type to be usable on the QML side. This one of the new ways Qt6 offers to expose your C++ types for use on the QML side. In Qt5, we had to explicitly call versions of the qmlRegisterType() method on the C++ side, but we don’t have to explicitly do that in Qt6 anymore. The block
enum TableRoles{
    TableDataRole = Qt::UserRole + 1,
};
is not required, but I use it to set up my own roles if the built-in ones aren’t sufficient for the problem at hand. Our new role is named TableDataRole. Enumerations (enums) are internally represented by integer values in C++, and we don’t want the integer value of TableDataRole to conflict with any other roles that have been defined earlier. Qt::UserRole gives us the value of the highest role defined previously. Assigning Qt::UserRole + 1 as a value to TableDataRole makes sure we don’t have conflicts. Next up we have our required methods, reproduced below for convenience.
public:
    explicit TableModel(QObject *parent = nullptr);
    int rowCount(const QModelIndex & = QModelIndex()) const override;
    int columnCount(const QModelIndex & = QModelIndex()) const override;
    QVariant data(const QModelIndex &index, int role) const override;
    QVariant headerData(int section, Qt::Orientation orientation, int role) const override;
    QHash<int, QByteArray> roleNames() const override;
The methods are qualified with the public keyword. This means that they are accessible and callable from the outside of the class definition. That is, outside the {}; block that delimits our class in tablemodel.h. We have briefly described these methods except for
explicit TableModel(QObject *parent = nullptr);
This is a constructor, and it’s what will be called when we try to create an instance of TableModel. Next up is the get_display_data() method.
Q_INVOKABLE
QVariant get_display_data(const QModelIndex& index);
This method is not part of the QAbstractItemModel interface. In other words, it’s not one of the methods that views expect your model type to have. I set it up here because I want it used on the QML side, to read data from our model at run time. The Q_INVOKABLE macro informs Qt that we want this method available and usable on the QML side. The last piece of the puzzle is
private:
    QVector<QVector<QString>> table;
This defines the internal data that our model will wrap around. In this case, I was after an easy way to represent a two-dimensional data structure that could be easily mapped to a table model. There are lots of ways one could do this, but I opted for a vector of vectors. You can think of QVector as a type we use to set up a list of things in C++. This concept may not be easy to understand if you are rusty on the topic of data structures. Take a look at the figure below.
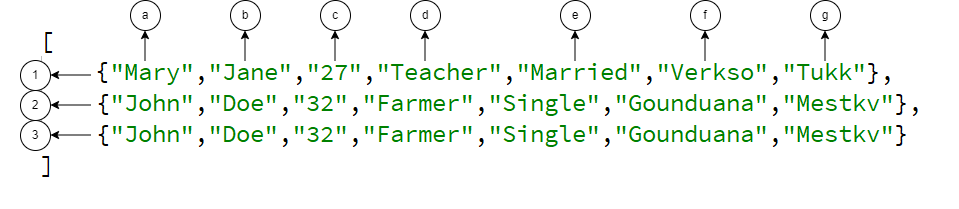
Think of the data between the [ and ] brackets as a list. The elements in that list are labeled 1,2 and 3: Element 1 is at index [0], element 2 is at index [1] and element 3 is at index [2]. Each element in the list is a list itself though. Elements in each of the nested lists are labeled a, b, c, d, e, f and g. One can think of this as a two-dimensional data structure, where (1,2, 3) are rows, and ( a, b, c, d, e, f, g) are columns. The figure below expresses the idea.
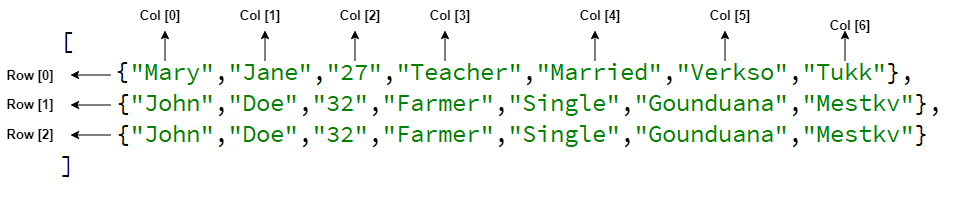
QVector is one of the Qt types that we can use to model list-like data structures. And the QVector<QVector<QString>> table syntax sets up table as the name of a two-dimensional vector of strings, just like we visualized in the figures above. Notice that the table lives in an area that is qualified with the private keyword, meaning that it’s not accessible beyond the bounds
of the class definition. What we have in the tablemodel.h header file are blueprints for the methods, but we still need to provide their implementations. We will host them in the tablemodel.cpp file. Open it up and change the content to be as shown below.
//tablemodel.cpp
#include "tablemodel.h"

//Constructor implementation
TableModel::TableModel(QObject *parent) : QAbstractTableModel(parent)
{
    //...
}

int TableModel::rowCount(const QModelIndex &) const
{
    //...
}

int TableModel::columnCount(const QModelIndex &) const
{
    //...
}

QVariant TableModel::data(const QModelIndex &index, int role) const
{
    //...
}

QVariant TableModel::headerData(int section, Qt::Orientation orientation, int role) const
{
   //...
}

QHash<int, QByteArray> TableModel::roleNames() const
{
    //...
}

QVariant TableModel::get_display_data(const QModelIndex &index){
    //...
}
The inner parts of the code are initially omitted for brevity. We will provide them one-by-one, and you can fill them in as we go. For now, just familiarize yourself with the general syntax for these implementations. Let’s look at the constructor implementation.
//The constructor
TableModel::TableModel(QObject *parent) : QAbstractTableModel(parent)
{
    table.append({"Mary", "Jane", "27", "Teacher", "Married", "Verkso", "Tukk"});
    table.append({"John", "Doe", "32", "Farmer", "Single", "Gounduana", "Mestkv"});
    table.append({"Mary", "Jane", "27", "Teacher", "Married", "Verkso", "Tukk"});
    table.append({"John", "Doe", "32", "Farmer", "Single", "Gounduana", "Mestkv"});
    //...
}
QVector has an append() method we can use to add elements to this data structure. This is the method that we can use to add a new list to the group of lists we currently have. One can say that the list containing the elements Mary, Jane, 27, Teacher, Married, Verkso and Tukk is the first element in our “list of lists.” In the first element, Mary is the first list. Each list we add through the append method can be seen as a row in our table. The column count is decided by the number of elements in each of our nested lists. To keep the table consistent, we make sure all rows have the same number of elements. We left the number of rows low in the book for space reasons, but in your code, you can even add 30 or more.
The rowCount() method is called by view classes when they need to know how many rows the model has. We could return a static value of 4 here, but what if later on you decide to add more rows to your table? It is more practical to deduce the number of rows from our table variable. We know that rows are items we added to our table variables through the append method in the constructor, so they technically are elements of the table vector. We can get the number of rows by asking the table how many elements it has. We can use the size method to get the number of elements in a vector variable.
int TableModel::rowCount(const QModelIndex &) const
{
    return table.size();//Number of rows
}
As we’ve said before, the column count can be deduced from the number of elements in each nested list. For example, looking at the first nested list with “Mary”,“Jane”,“27”,“Teacher”,“Married”,“Verkso” and “Tukk” as elements, we can see that we have 7 columns in our table. Let’s write the code for the columnCount method.
int TableModel::columnCount(const QModelIndex &) const
{
    return table.at(0).size();//Columns
}
table.at(0) gives us the first nested list. We get our column count by calling the size method on it. The data method is one of the most important ones, it’s what views call when they want to fetch data from the model. Here is our implementation.
QVariant TableModel::data(const QModelIndex &index, int role) const
{
    switch (role) {
    case TableDataRole:
    {
        return  table.at(index.row()).at(index.column());
    }
    default:
        break;
    }
    return QVariant();
}
The method takes QModelIndex and int as parameters. QModelIndex is a type that embodies the location of the item in the model. Some of the information it contains includes row and column information. The second parameter specifies which role we’re trying to read the data for. In this case, we want to use our own custom TableData role to return data at a given row and column. The first call of the at method, table.at(index.row()) gives us the location of the row (the entire nested list). The second calls gives us the location of the element in the nested list, table.at(index.row()).at(index.column()). You can say that the first call to at()
takes us to the correct row, and the second call takes us to the currect column. The element at the correct row and column is then returned from the method. If we’re not dealing with the TableDataRole, we just return an empty piece of data through QVariant(). The method returns the QVariant type because the data method can be called for a variety of reasons, the view may call it with the Qt::DecorationRole to get some background color information from the model, or with TableDataRole as we’re doing here, to get a string for display. QVariant is wired with the ability to represent a variety of types. I leave to you read the docs on it if you need more information. The headerData method is used to return data that’ll be used in the headers of the table, be it horizontal or vertical. Let’s look at the implementation.
QVariant TableModel::headerData(int section, Qt::Orientation orientation, int role) const
{
    if (role != Qt::DisplayRole) {
        return QVariant();
    }
    if (orientation == Qt::Horizontal && section == 0) {
        return "Name";
    } else if (orientation == Qt::Horizontal && section == 1) {
        return "Name";
    } else if (orientation == Qt::Horizontal && section == 2) {
        return "Age";
    } else if (orientation == Qt::Horizontal && section == 3) {
        return "Job";
    } else if (orientation == Qt::Horizontal && section == 4) {
        return "Status";
    } else if (orientation == Qt::Horizontal && section == 5) {
        return "Country";
    } else if (orientation == Qt::Horizontal && section == 6) {
        return "City";
    }

    if(orientation == Qt::Vertical){
        return QVariant::fromValue(section + 1) ;
    }
    return QVariant();
}
It takes three parameters, the first one, section, represents the row or column for which we need header data for. If the header is horizontal, it’ll be the column index. If the header is vertical, it’ll be the column index. The orientation is decided by the second Qt::Orientation parameter to the method. Possible values are Qt::Horizontal and Qt::Vertical. If views call this method to get string data for display in header cells, they will pass Qt::DisplayRole as the third argument. That’s why if we detect that the passed role is not Qt::DisplayRole, we return an empty piece of data through QVariant(). Once we are sure that the method was called with Qt::DisplayRole, we return header string data. For horizontal headers, we return “Name” for the first column at index 0, “Name” for the second column at index 1,… and “City” for the 7’th column at index 6. For vertical headers we just return the incremented section value. This way rows will be numbered 1,2,3,… all the way to however many rows we have in the model. The roleNames method is there to expose new roles that we create on the C++ side, just like TableDataRole, to be visible and usable on the QML side. Here is our implementation.
QHash<int, QByteArray> TableModel::roleNames() const
{
    QHash<int, QByteArray> roles;
    roles[TableDataRole] = "tabledata";
    //roles[SomeOtherRole] = "someotherrole"; // You can set up multiple mappings if needed
    return roles;
}
This method returns a set of mappings between the role on the C++ side and the role name, as a string literal, we need to use on the QML side. In this case, if we use “tabledata” as a role on the QML side, we’ll want that to map to TableDataRole on the C++ side. Mappings are stored in a QHash<int, QByteArray> type. So we create a local object of it, put in the mapping through the roles[TableDataRole] = "tabledata"; syntax and return the local variable. Notice that you can specify several mappings if it’s needed for the problem at hand. The last method is shown below.
QVariant TableModel::get_display_data(const QModelIndex &index){
    return data(index,TableDataRole );
}
As stated before, this method is not part of the QAbstractItemModel interface. It’s a custom method we’ll be using on the QML side to read data from the model when some button is clicked. It doesn’t do anything special, it’s just going to reuse the data method, passing in TableDataRole as a role argument. I realize this may be a lot to take in if you’re using C++ models for the first time, but I believe this is the best way to learn; seeing things in action and reverse engineering your way through these difficulties. This completes our tablemodel.cpp file. Please take a moment to make sure you have a good idea about this model, especially the fact that our model is wrapping around a two-dimensional vector of strings, and exposing it in a language that QML views like TableView would understand; the QAbstractItemModel interface.
Exposing the C++ model to QML
Now that we have our model code hosted both in tablemodel.h and tablemodel.cpp, we can expose the model for consumption on the QML side. I hate to break it to you, but your table model class already satisfies the requirements to be visible and usable on the QML side. But I’d like to repeat and highlight them in one place so there is no confusion about that:
- We added the QML_ELEMENT macro inside our class
- We also added the
tablemodel.handtablemodel.cppfiles under the SOURCES section of our qt_add_qml_module command inside the CMakeLists.txt file of our project.
By doing these two things, you are making sure the tablemodel files are part of the app12-TableViewCppModel QML module that our QML application is part of. QML modules are a big thing in Qt6 and I have plans on exploring them in detail in my upcoming courses and books. If you’re interested in them, do let me know in the comments below. Now that we have the model properly exposed for use on the QML side, we can instantiate it on the QML side as shown below.
TableModel{
    id: tableModelId
}
Consuming the C++ model on the QML side
We won’t do anything special to consume the model on the QML side, we will just instantiate it. The entire code in the Main.qml file is reproduced below for convenience.
//Main.qml
import QtQuick
import QtQuick.Controls

ApplicationWindow {
    width: 680
    height: 400
    visible: true

    HorizontalHeaderView {
        id: horizontalHeader
        anchors.left: tableViewId.left
        anchors.top: parent.top
        syncView: tableViewId
        clip: true

    }

    VerticalHeaderView {
        id: verticalHeader
        anchors.top: tableViewId.top
        anchors.left: parent.left
        syncView: tableViewId
        clip: true

    }

    //Qt Creator may throw warnings on this code but it's just having a hard time. You can ignore them.
    TableModel{
        id: tableModelId
    }

    TableView {
        id: tableViewId
        anchors.left: verticalHeader.right
        anchors.top: horizontalHeader.bottom
        anchors.right: parent.right
        anchors.bottom: parent.bottom

        columnSpacing: 1
        rowSpacing: 1
        boundsBehavior: Flickable.StopAtBounds

        model: tableModelId

        delegate:  Label {
            text: model.tabledata
            width: 100
            padding: 12

            Rectangle {
                anchors.fill: parent
                color: "#efefef"
                z: -1
            }
        }
    }

    Button{
        text: "See the data"
        anchors.bottom: parent.bottom
        onClicked: {
            console.log(tableModelId.get_display_data(tableModelId.index(0,1)))
        }
    }
}
We instantiate the model,
TableModel{
    id: tableModelId
}
and go through our custom get_display_data method to read data from the model when the button is clicked.
Button{
    text: "See the data"
    anchors.bottom: parent.bottom
    onClicked: {
        console.log(tableModelId.get_display_data(tableModelId.index(0,1)))
    }
}
In this case we are reading data living at the location (row: 0, column: 1). If you run the application will all these changes in the Main.qml file, you should see a window similar to the figure below.
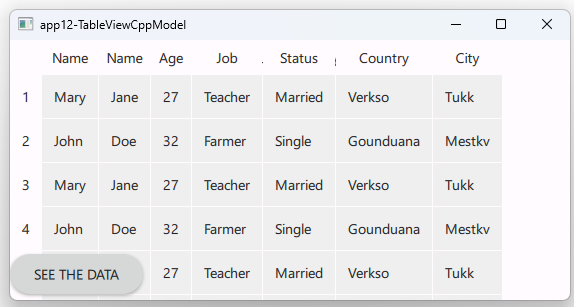
You can swipe up/down or left/right to show data not currently in the visible area of the screen. If you see fewer rows than I have in the figure, you can add more to your model constructor implementation. Click on the button, and you should see the output below in the application output pane of your running instance of Qt Creator.
qml: Jane
We’re printing the data inside the cell at the location (row: 0, column: 1) in our table, which currently is “Jane”. I know we’ve seen a lot of new knowledge in this section, but this is what you’ll be doing most of the time as a professional Qt/QML developer, when it comes to TableView; building your table models in C++ and exposing them to QML for consumption. Run the application and play with it. Modify the code to add new rows, or even new columns, change the boring delegate we have in place to use DelegateChooser. Trying to change and bend the code to your own liking is the best way you learn these things. Of course, the best partner you can wish for in all this is the official Qt docs.
Summary
Congratulations on reaching the conclusion of this article! By now, you should have a solid foundation of knowledge to create your models and make intricate data accessible from the C++ perspective. The key takeaway is to grasp the interface methods embedded within your chosen base class, as demonstrated using QAbstractTableModel in this article. While certain methods like rowCount() and data() are essential, you may find it necessary to override and customize them to meet your specific requirements.
Once your model is configured in C++, you can expose it as a QML type and seamlessly integrate it as a model for the TableView component on the QML side. As you become more proficient with these concepts, they will become second nature and prove invaluable in your project endeavors.
For those seeking the source code used in this article, you can access it here. We trust that you have found value in this article. If you crave more insightful content, explore our comprehensive course catalog. Additionally, we offer a published book that systematically delves into the latest trends in QML.
Do you have any ingenious tips for exposing complex models for QML consumption, or perhaps burning questions? Feel free to share them in the comments below. I look forward to engaging with you in future discussions. Until then, happy coding!
Qt6 QML For Beginners Book
Fluid and dynamic user interfaces for desktop, mobile and embedded devices.


High Quality Video Courses on Qt, Modern C++, QML and More

Learn and Master Qt, QML and C++ with Minimal Effort, Time and Cost