From Zero to Production: Architecting a Qt 6 QML Application the Right Way
Every Qt Quick project starts at the same place. You open Qt Creator, go to File > New Project, pick Qt Quick Application, and hit Choose. A few clicks later, you have a project with three files:
MyApp/
│   CMakeLists.txt
│   main.cpp
│   Main.qml
It’s clean. It’s simple. And if you’re just learning, it’s perfect. You add a Text element, maybe a Button, wire up an onClicked handler, and boom, you’ve got a working app. Life is good.
But then real life shows up.
You need to fetch data from a REST API. You need a list that users can search, filter, and sort. You need to save things to disk. Before you know it, your Main.qml is 800 lines long, you’ve got business logic mixed in with your button colors, and adding a new feature feels like performing surgery with oven mitts.
I’ve been there. And after building several Qt 6 applications, I’ve landed on a project structure that scales without making you hate your code three months later. I use this structure in the book projects like the GitHub Repository Explorer and the Contact Manager, and it’s the same pattern I use in my own apps. Well, at least variations of it.
Let me walk you through it.
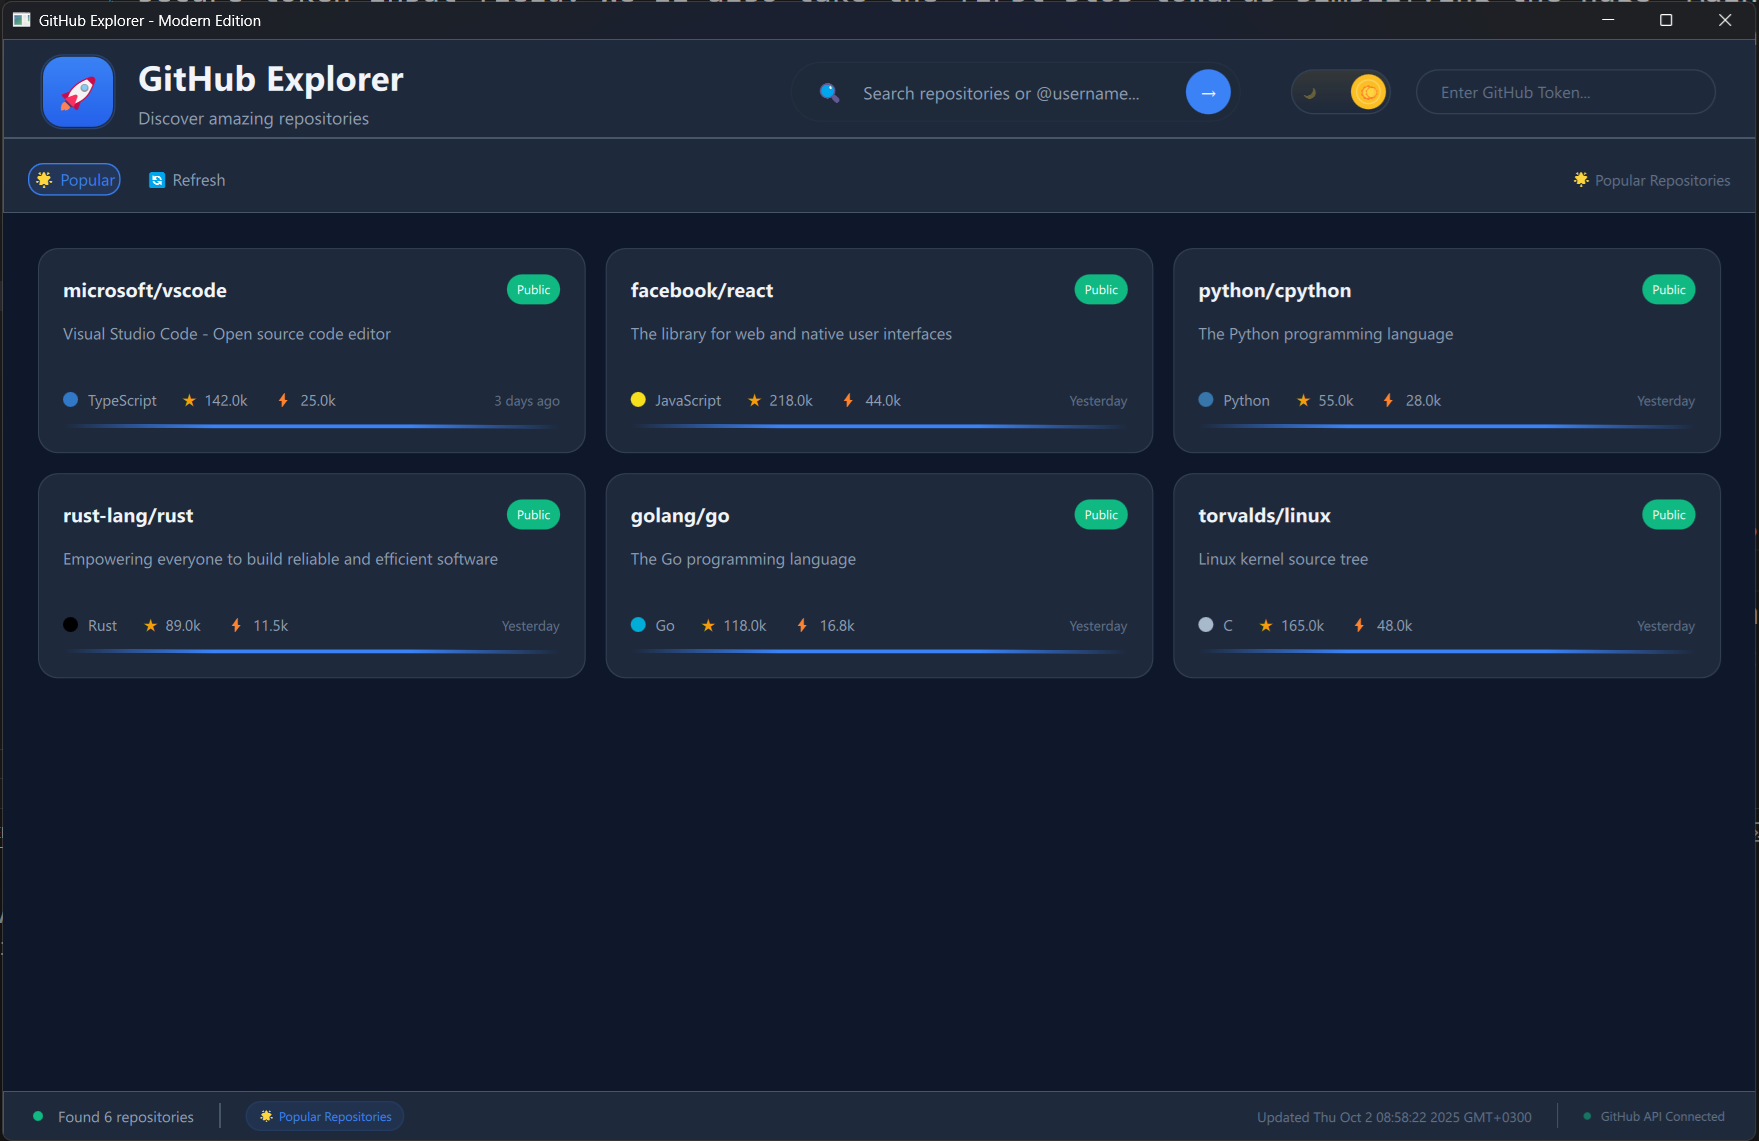
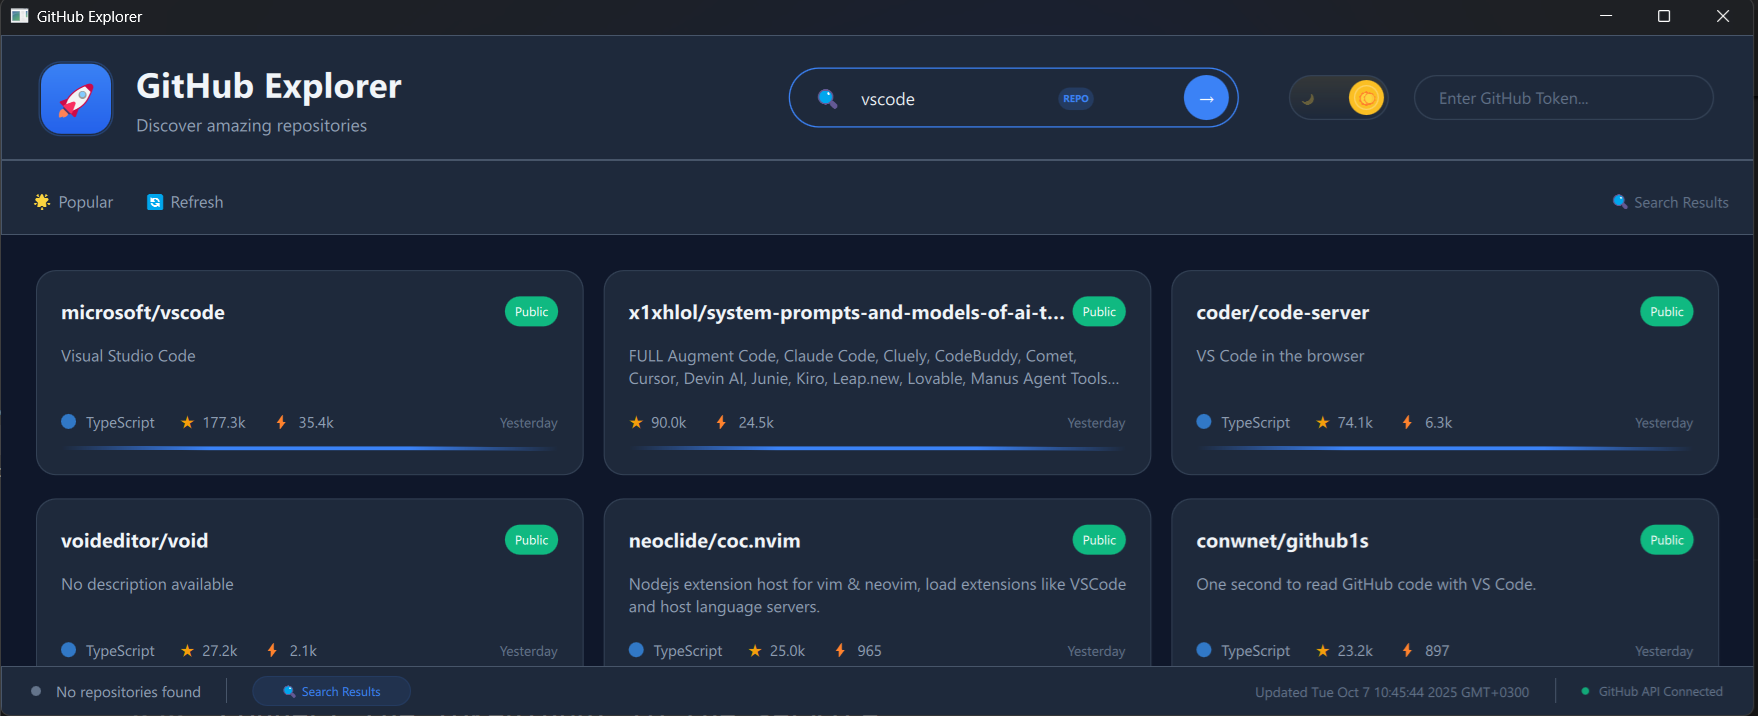
These are real, fully functional applications. Here is the GitHub Repository Explorer, for example, pulling live data from the GitHub API:
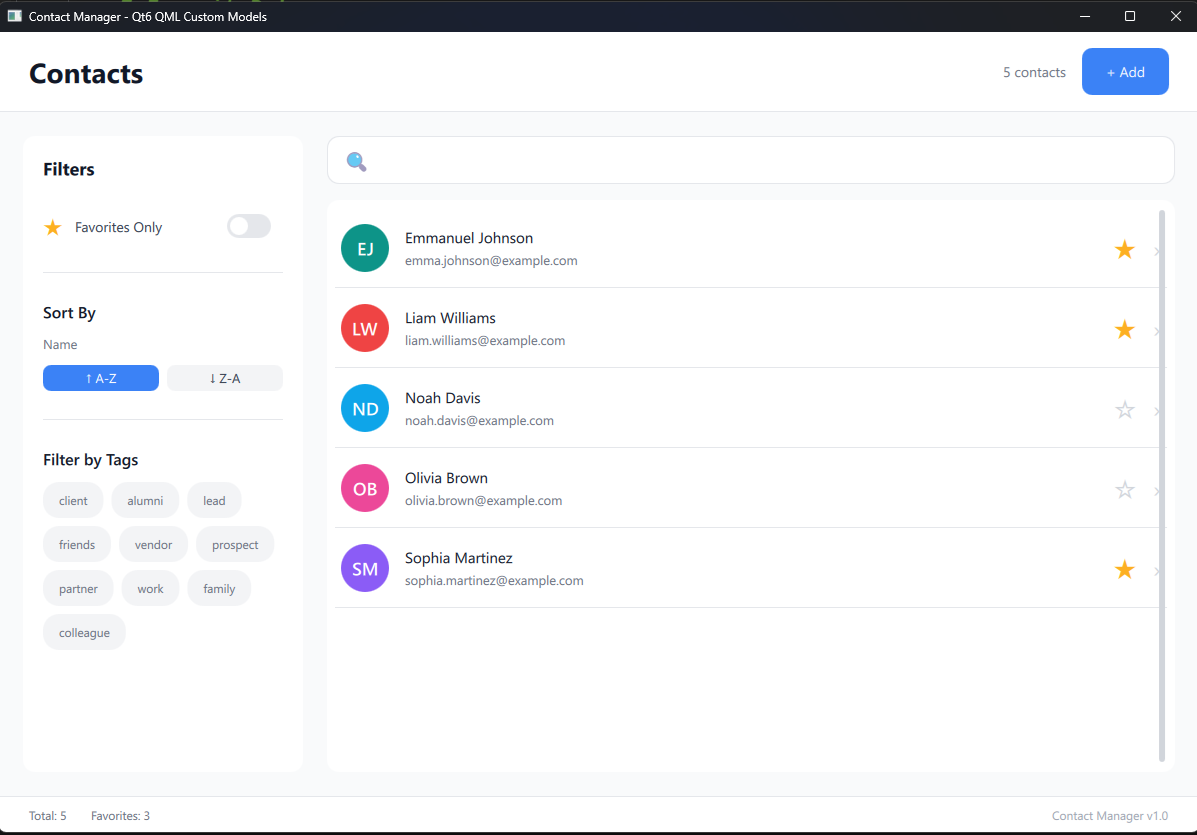
And here is the Contact Manager with its search bar, filter panel, tag-based filtering, and favorites:
Both of these are built step-by-step in my book Qt 6 QML Advanced. Every architectural decision I describe below comes directly from building them. If you want the full working code and walkthrough, that’s where to find it.
The Three-File Start
You already know this part, but let’s make sure we’re on the same page. When Qt Creator generates your project, you get the holy trinity:
- CMakeLists.txt : the build system file. This is where CMake looks to figure out what files make up your project and how to build them.
- main.cpp : the C++ entry point. It creates your application, fires up the QML engine, and loads your main QML file.
- Main.qml : your UI. The visual stuff.
This is fine for a “Hello World.” But here’s the thing: as soon as you add your first C++ class to talk to the backend, you need to make a decision about where things go. And that decision will either save you or haunt you.
The First Move: Create a qml/ Folder
The very first thing I do when starting a real project is move Main.qml into a qml/ subfolder. It sounds small, but it sets the tone for everything that comes after. When I set up the Contact Manager project in my book, here’s what the starter project looks like after this one small cleanup:
ContactManager/
│   CMakeLists.txt
│   main.cpp
└── qml/
    └── Main.qml
You update your CMakeLists.txt to reflect this:
set(QML_FILES
    qml/Main.qml
)

qt_add_qml_module(ContactManager
    URI ContactManagerApp
    VERSION 1.0
    QML_FILES ${QML_FILES}
)
And your main.cpp loads the module by name:
engine.loadFromModule("ContactManagerApp", "Main");
Nothing fancy yet, but if you run the project now, you’ll see a window titled “ContactManager.” An empty canvas, ready for what comes next.
Why bother with this? Because as you add more QML files, and you will add more, you want a dedicated home for them. Trust me on this one.
Growing Up: Components and Pages
Here’s where it gets interesting. As your app grows, your qml/ folder needs some organization of its own. When I built the Contact Manager, the QML side evolved into this:
qml/
├── Main.qml
├── components/
│   ├── ContactDelegate.qml
│   ├── FilterPanel.qml
│   └── SearchBar.qml
└── pages/
    └── ContactListPage.qml
The rule is simple:
- components/ : reusable pieces. A search bar, a delegate for rendering a contact in a list, a filter panel. Things you might use in multiple places.
- pages/ : screen-level compositions. A page that puts the search bar, the filter panel, and the contact list together into one coherent screen.
When I built the GitHub Repository Explorer, the same pattern showed up with components like RepoCard.qml, Header.qml, StatusBar.qml, LoadingOverlay.qml, and EmptyState.qml. Different app, same structure. That’s when you know you’re onto something.
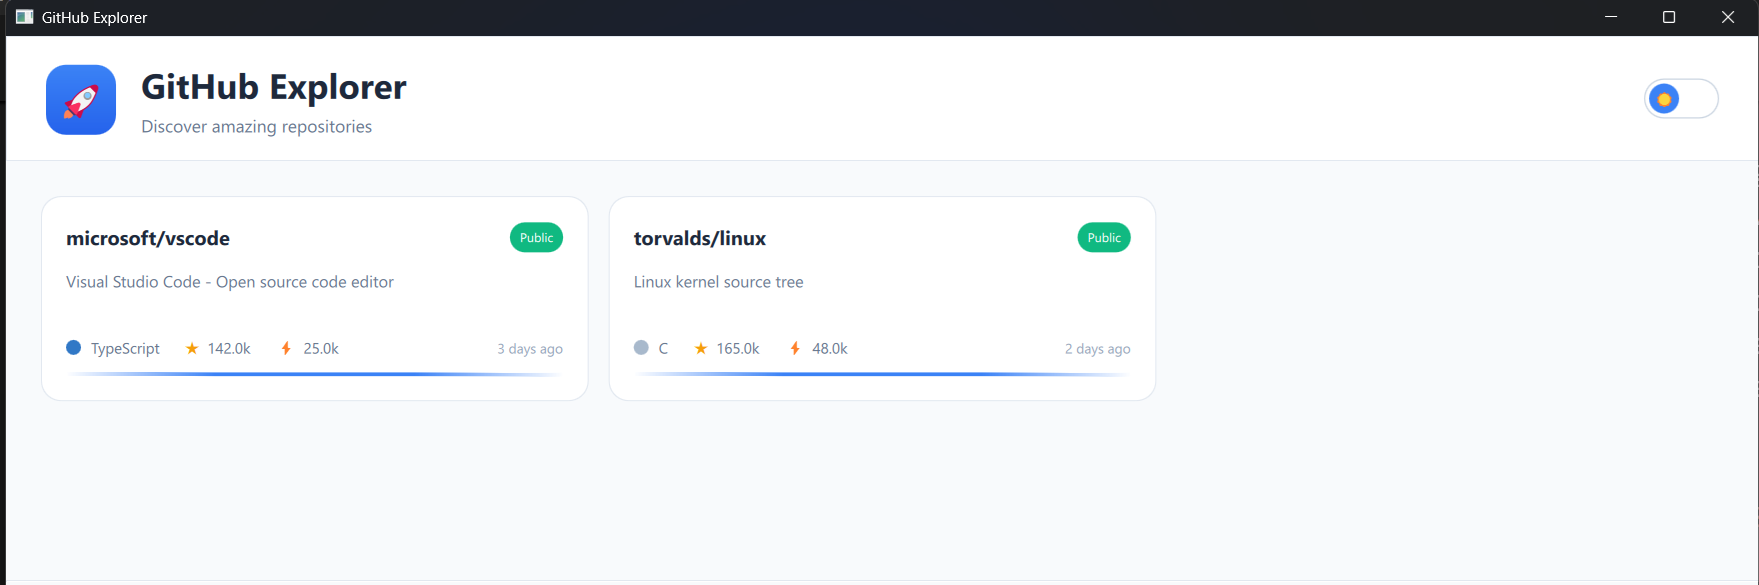
The GitHub Explorer even supports light and dark themes, and the component structure makes that painless. Each component reads from a shared theme object, and toggling between modes just works:
The C++ Side: Models, Managers, and Utils
Now let’s talk about the C++ side, because this is where most Qt projects go off the rails. The temptation is to create a C++ class, dump it as a context property in main.cpp, and call it a day. And look, that works. I even do it as a first step when I’m prototyping. In the Contact Manager, the first time I wired the model to QML, I did exactly this:
ContactListModel contactModel;
engine.rootContext()->setContextProperty("contactsModel", &contactModel);
And in QML:
ListView {
    model: contactsModel
    // ...
}
It works. But as the app grows, you end up with multiple context properties scattered across main.cpp, and your QML has no idea where its data is coming from. It’s the Qt equivalent of global variables.
The better approach is to organize your C++ code into clear layers and use QML_ELEMENT to make your types instantiable directly in QML. Here’s what the Contact Manager’s C++ side looks like:
src/
├── models/
│   ├── contact.h / .cpp
│   ├── contactlistmodel.h / .cpp
│   └── contactfilterproxymodel.h / .cpp
├── managers/
│   └── contactmanager.h / .cpp
└── utils/
    └── jsonserializer.h / .cpp
Three folders, three responsibilities:
- models/ : your data. The
Contactclass is a pure data container. TheContactListModelis aQAbstractListModelthat wraps aQVector<Contact>and exposes it to QML through custom roles. TheContactFilterProxyModelsits on top and handles search, filtering, and sorting without ever touching the source data. - managers/ : your business logic. The
ContactManagerowns the model, coordinates CRUD operations, tracks statistics, and is the single entry point for QML. It’s the class you actually instantiate in your UI. - utils/ : your helper code. The
JsonSerializerhandles saving and loading contacts to disk.
The Manager Pattern: Your QML’s Best Friend
This is the piece that really ties everything together. Instead of sprinkling context properties all over main.cpp, you create a ContactManager class with QML_ELEMENT, and QML instantiates it directly:
class ContactManager : public QObject
{
    Q_OBJECT
    QML_ELEMENT
    Q_PROPERTY(ContactListModel* contactModel READ contactModel CONSTANT)
    Q_PROPERTY(ContactFilterProxyModel* proxyModel READ proxyModel CONSTANT)
    Q_PROPERTY(int totalContacts READ totalContacts NOTIFY totalContactsChanged)
    Q_PROPERTY(int favoritesCount READ favoritesCount NOTIFY favoritesCountChanged)
    // ...
};
And in QML, you just create it like any other element:
ApplicationWindow {
    ContactManager { id: contactManager }

    ContactListPage {
        anchors.fill: parent
        contactManager: contactManager
    }
}
That’s it. No context properties in main.cpp. No global state floating around. The ContactListPage declares a required property ContactManager contactManager, receives it from its parent, and everything flows from there:
ListView {
    model: root.contactManager.proxyModel

    delegate: ContactDelegate {
        firstName: model.firstName
        lastName: model.lastName
        email: model.email

        onFavoriteToggled: {
            root.contactManager.toggleFavorite(
                root.contactManager.proxyModel.mapToSourceIndex(index)
            )
        }
    }
}
QML just binds to properties and calls methods. It never parses JSON. It never manages arrays. It never does business logic. All of that lives in C++ where it belongs.
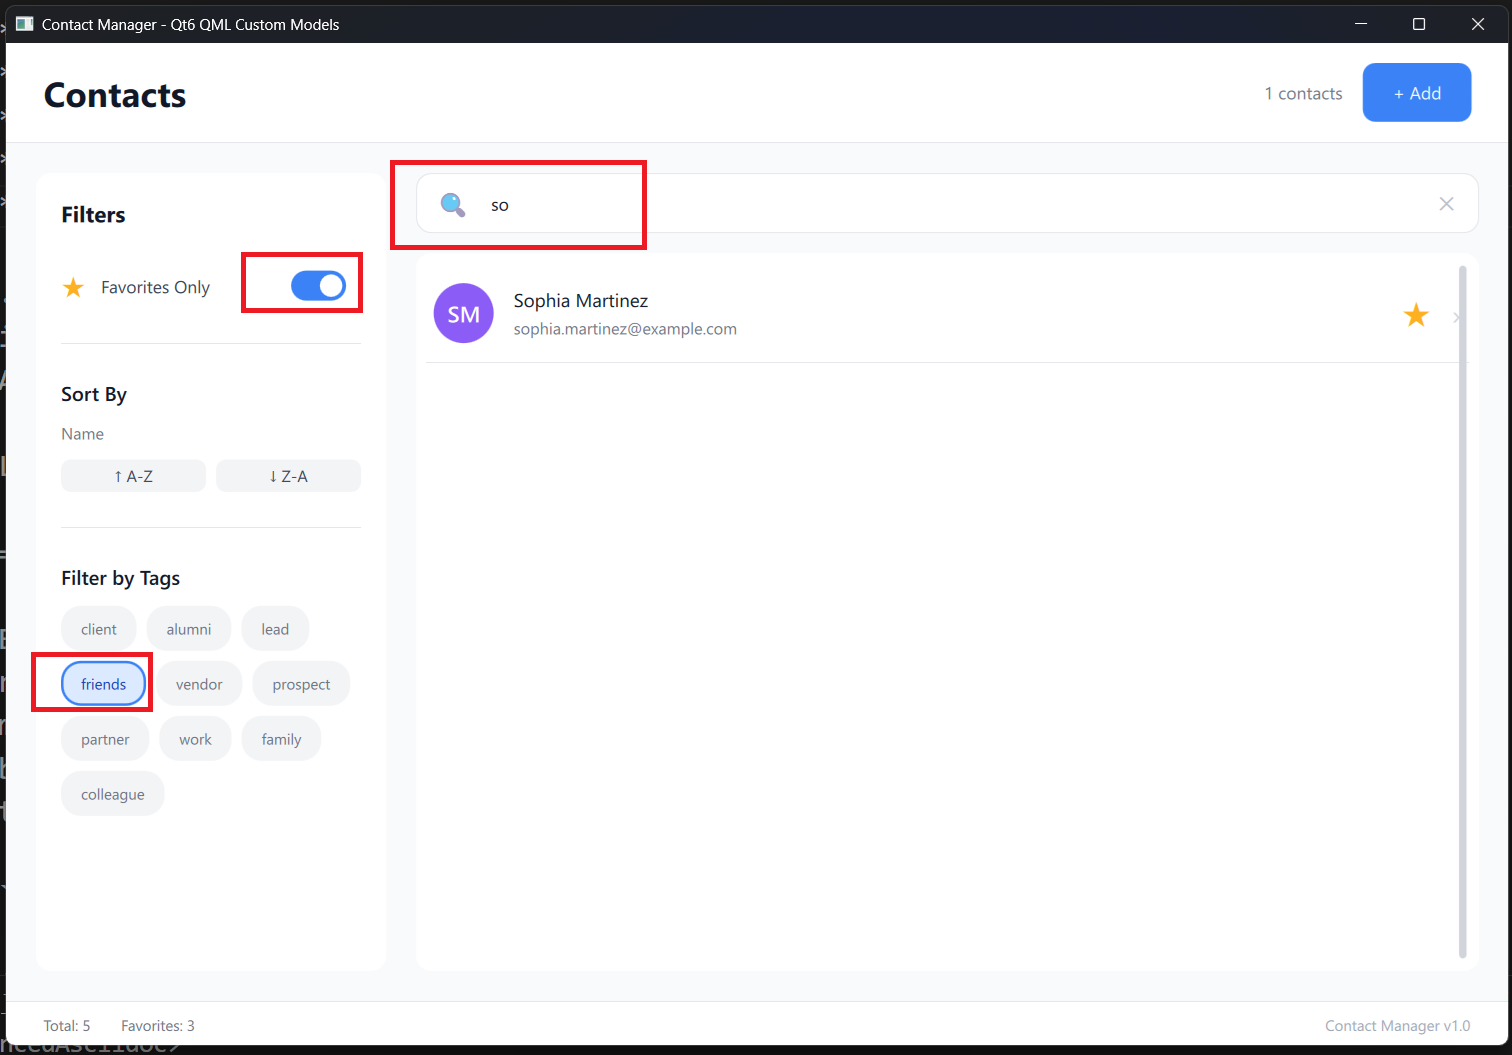
The result is that features like search, filtering by favorites, and tag-based filtering all work through clean property bindings. Here’s the Contact Manager in action with search and filtering applied at the same time:
And when you need to add new contacts or view details, each dialog is its own QML component, self-contained and clean:
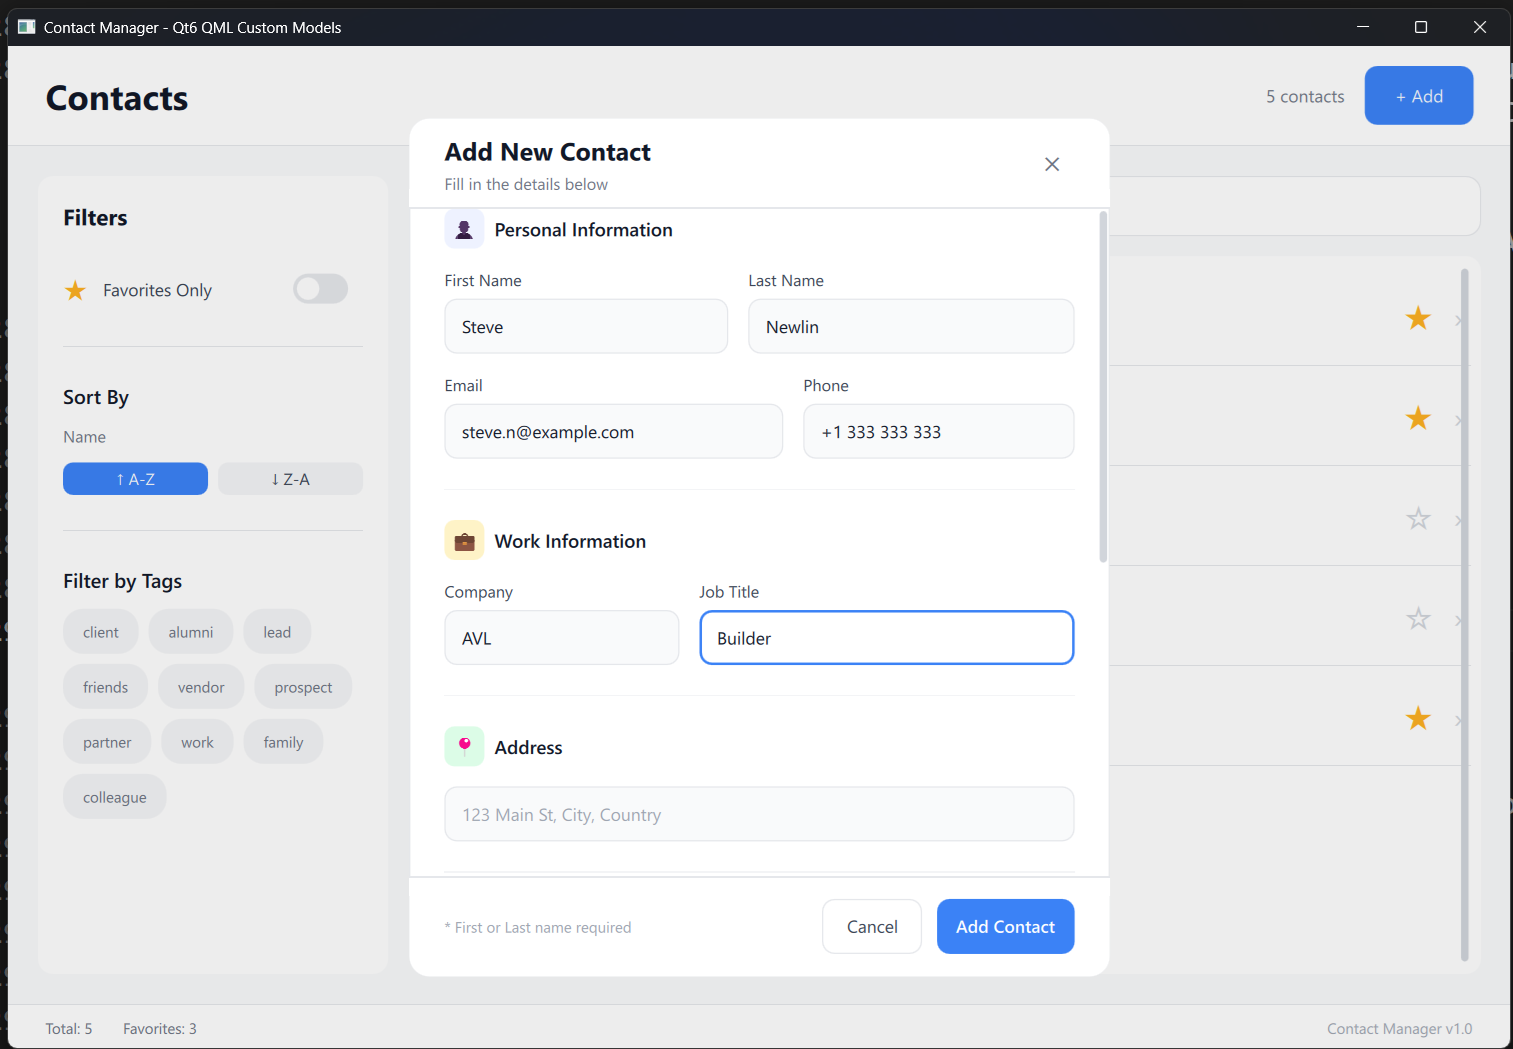
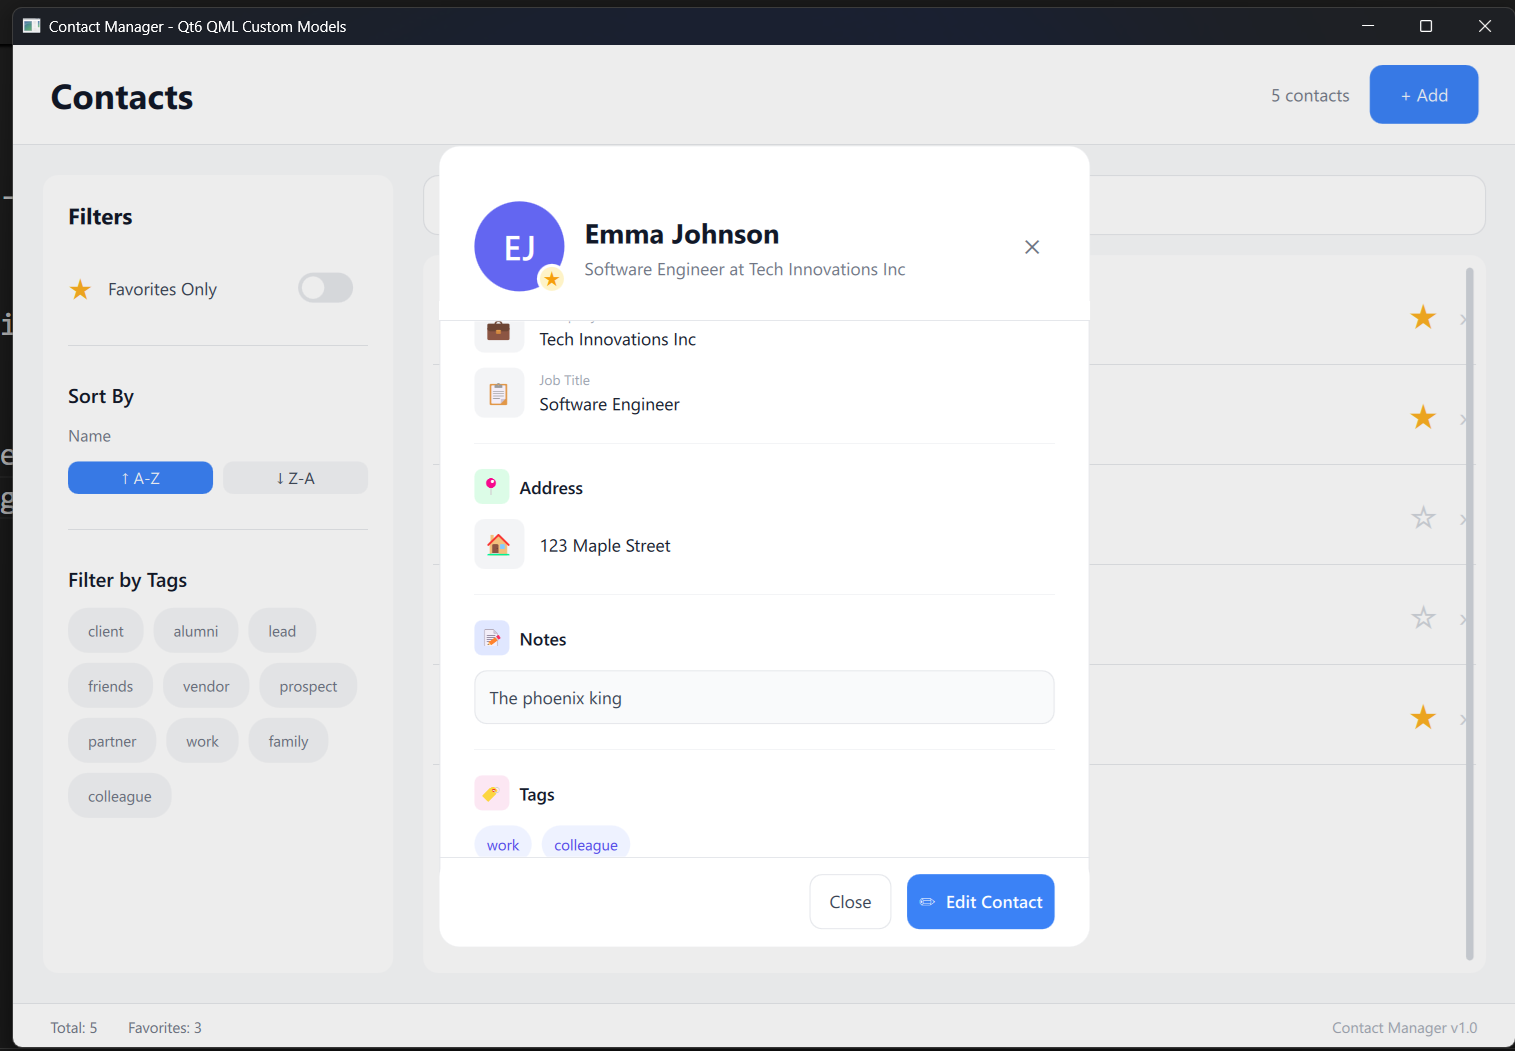
None of these dialogs know how data is stored or managed. They just call methods on the ContactManager and bind to its properties. That’s the power of this architecture.
The Full Picture
Put it all together and your project looks like this:
ContactManager/
│   CMakeLists.txt
│   main.cpp
├── qml/
│   ├── Main.qml
│   ├── components/
│   │   ├── ContactDelegate.qml
│   │   ├── FilterPanel.qml
│   │   └── SearchBar.qml
│   └── pages/
│       └── ContactListPage.qml
└── src/
    ├── models/
    │   ├── contact.h / .cpp
    │   ├── contactlistmodel.h / .cpp
    │   └── contactfilterproxymodel.h / .cpp
    ├── managers/
    │   └── contactmanager.h / .cpp
    └── utils/
        └── jsonserializer.h / .cpp
Is this the only way to structure a Qt 6 project? Of course not. But I can tell you from experience that this separation, QML for the look, C++ models for the data, managers for the logic, and utils for the plumbing, holds up as your app grows from a prototype into something real.
When you need to add search and filtering, you create a QSortFilterProxyModel in src/models/ and your UI just binds to it. When you need persistence, you add a serializer in src/utils/ and the manager calls it automatically on add, edit, and delete. When you need to break your project into reusable modules, Qt 6’s module system lets each module have its own CMakeLists.txt and URI, and QML imports them by name.
The GitHub Explorer uses the same separation. The search feature? It just calls a method on the service class and the results flow through the model into the grid:
The architecture doesn’t fight you. It grows with you.
The Takeaway
Next time you create a new Qt Quick project and see those three familiar files staring back at you, resist the urge to start building everything in Main.qml. Take five minutes to create a qml/ folder, a src/ folder with some subdirectories, and a manager class with QML_ELEMENT. Your future self, the one debugging a feature at 11 PM on a Thursday, will thank you.
If you want to see this architecture in action with full working code, step-by-step, I walk through building both the GitHub Repository Explorer and the Contact Manager from scratch in my book Qt 6 QML Advanced. Every pattern described here comes from a real project you build along the way. And if you’re starting from the beginning with Qt 6 and QML, there’s a bundle that includes both the beginner and advanced books so you can go from zero to building apps like these at your own pace.
Happy coding!
Qt6 QML For Beginners Book
Master the fundamentals of Qt6 QML development with this comprehensive 400+ page guide. Learn declarative UI programming from scratch with real-world examples and cross-platform development techniques.
Qt6 QML Advanced - C++ Integration
Take your Qt6 QML skills to the next level with advanced C++ integration techniques. 350+ pages covering QML-C++ integration, performance optimization, and advanced patterns for production-ready applications.

Desktop Apps with Qt Widgets and C++

Master professional desktop application development using Qt Widgets and modern C++. 40+ hours of content with 5+ real projects. Perfect for beginners to intermediate developers.
Desktop Apps with Qt Widgets and PySide6

Learn to build powerful desktop applications using Qt Widgets and Python. 35+ hours of hands-on content with 4+ real-world projects to boost your Python GUI skills.
Qt QML From Beginner to Pro
Master modern UI development with Qt QML and Qt Quick. 50+ hours of comprehensive training with 6+ real projects. Build fluid, dynamic interfaces for desktop, mobile, and embedded devices.
Multi-Threading and IPC with Qt C++

Harness the power of multi-threading and inter-process communication in Qt. 8-12 hours of intensive training with 6+ hands-on demos. Take your Qt C++ skills to the next level.