Three Dashboards, One Weekend: What Qt's Technologies Actually Feel Like to Build With
Here’s a question I get more than almost any other: “Which Qt technology should I use?”
And my honest answer has always been: it depends. It depends on your team, your target platform, your performance requirements, your love of Python or distaste for compilation. All of that matters. But the frustrating thing is that most people are asking the question before they’ve actually built anything in any of these technologies. They’re reading blog posts and forum threads and trying to make a major architectural decision based on second-hand opinions.
So I wrote a book that takes a different approach.
Instead of telling you which technology to pick, I built the same application three times: once in Qt Widgets with C++, once in Qt Widgets with PySide6, and once in Qt Quick with QML. Then I let you build all three yourself in a single weekend. Same dashboard. Same features. Three completely different implementations. And by the end, you don’t need anyone’s opinion anymore. You have your own.
What You’re Actually Building
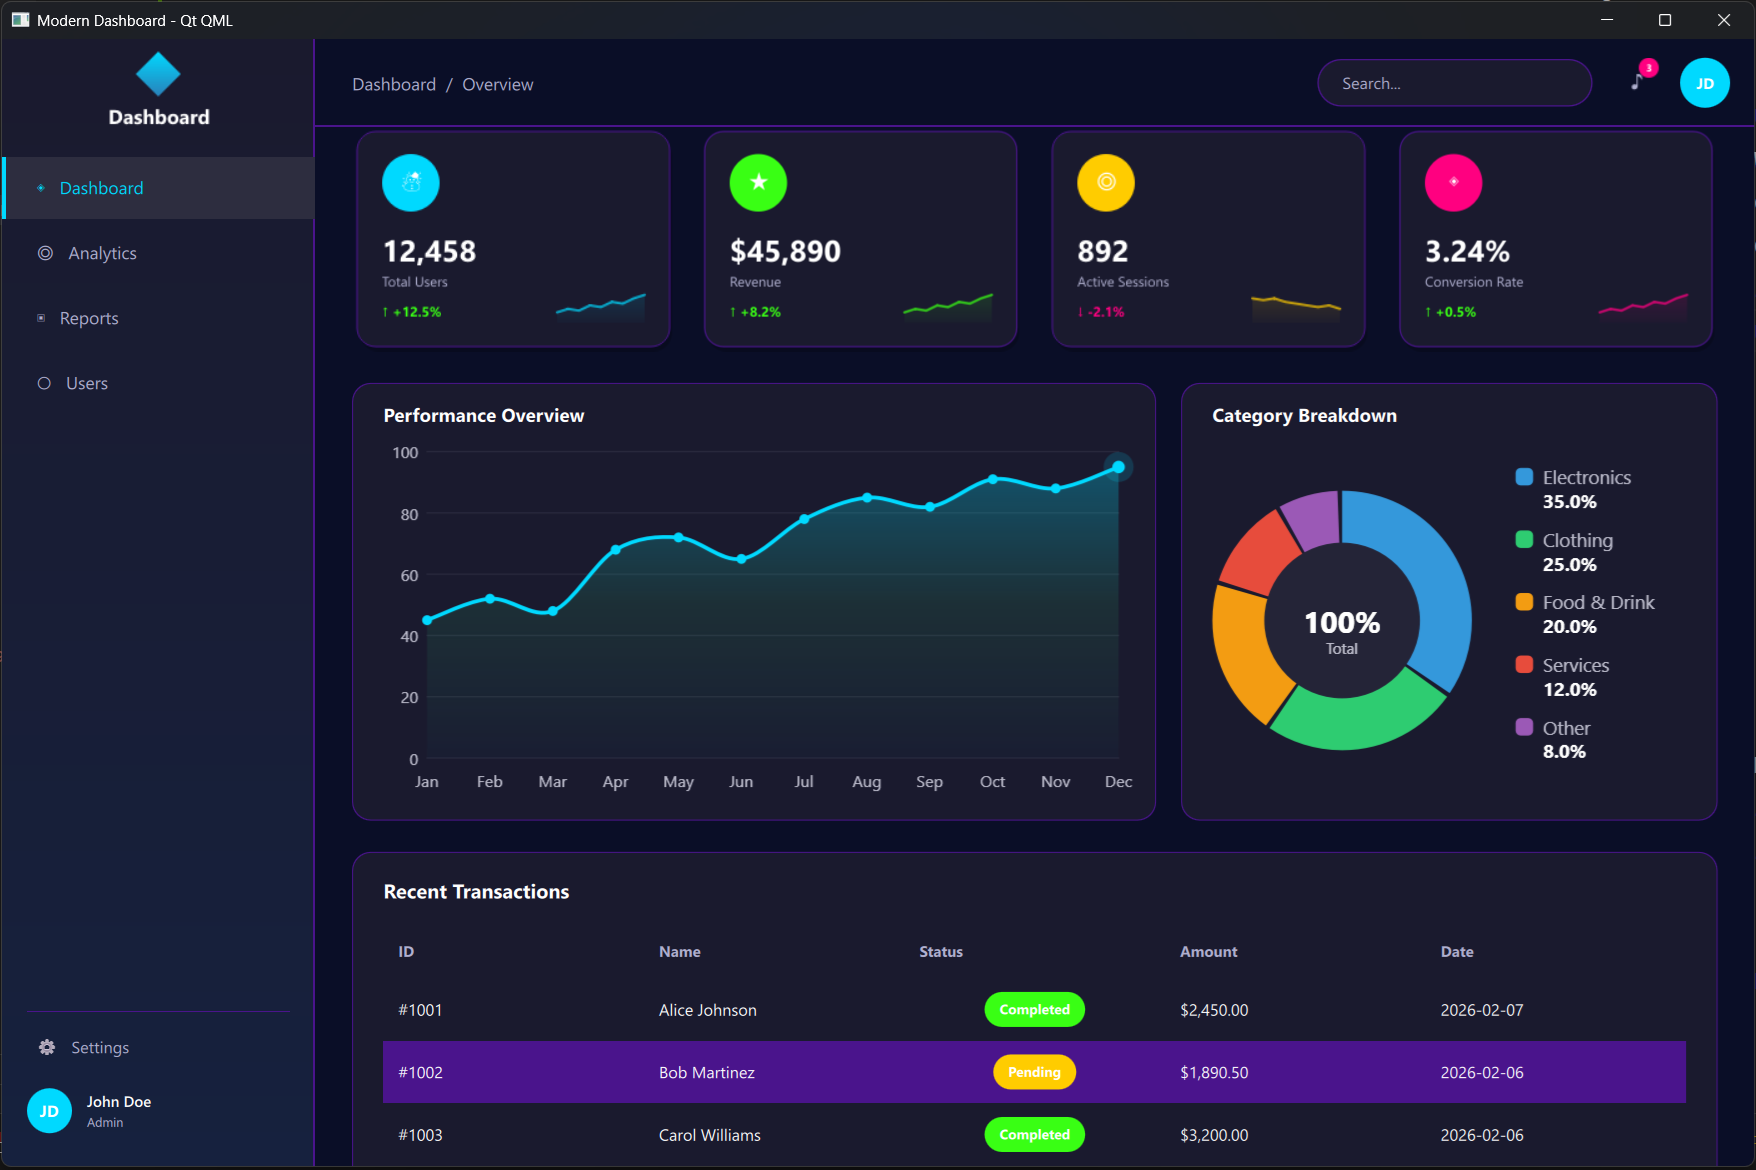
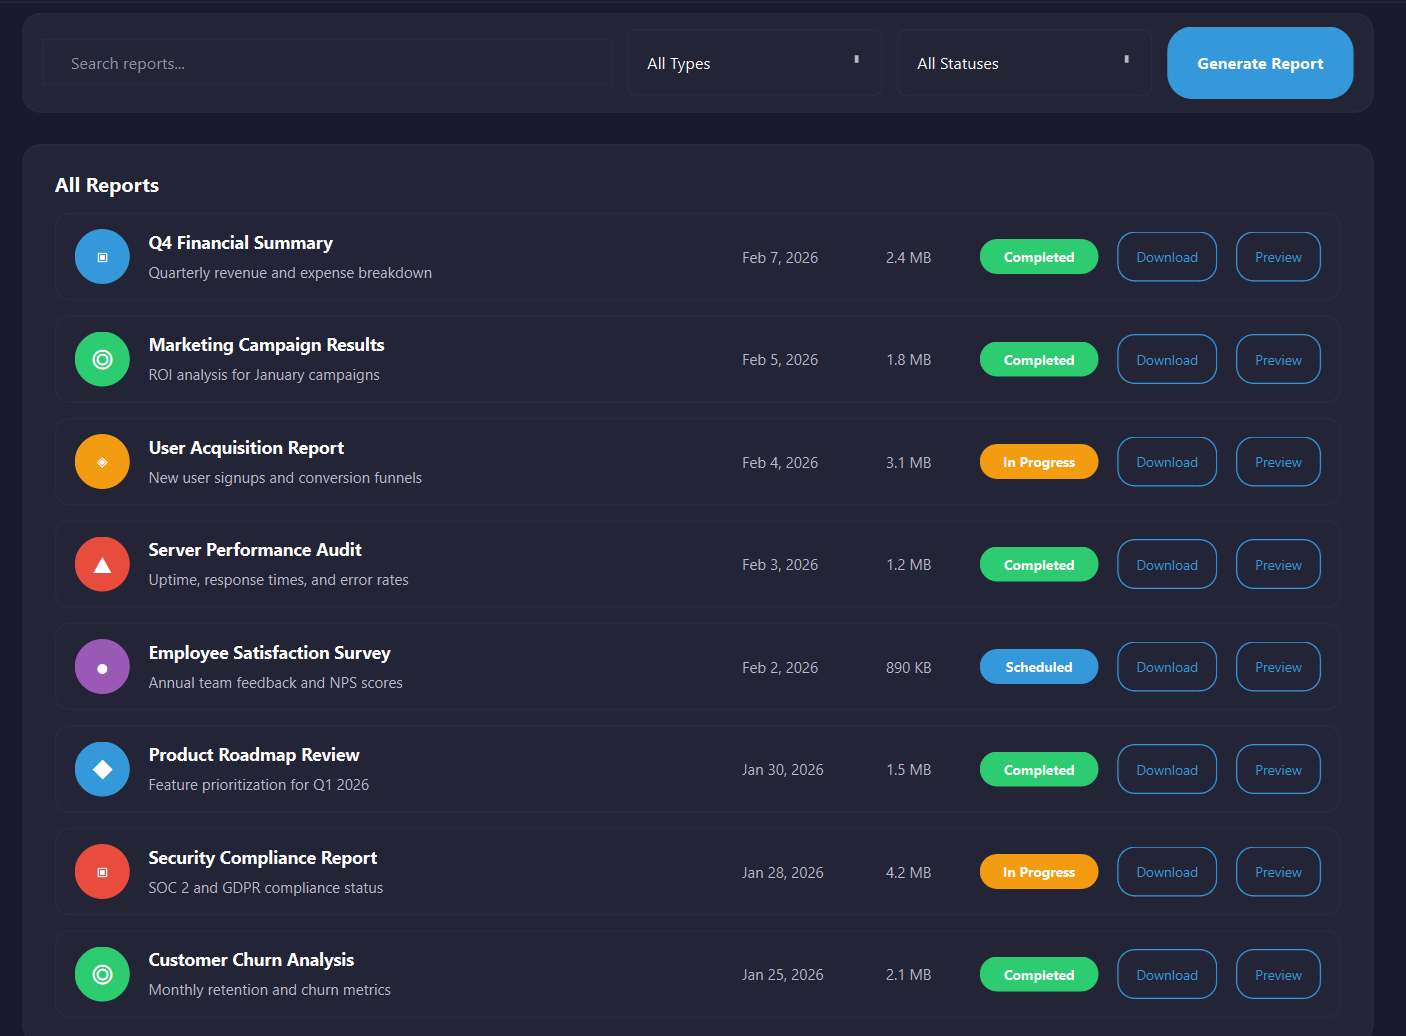
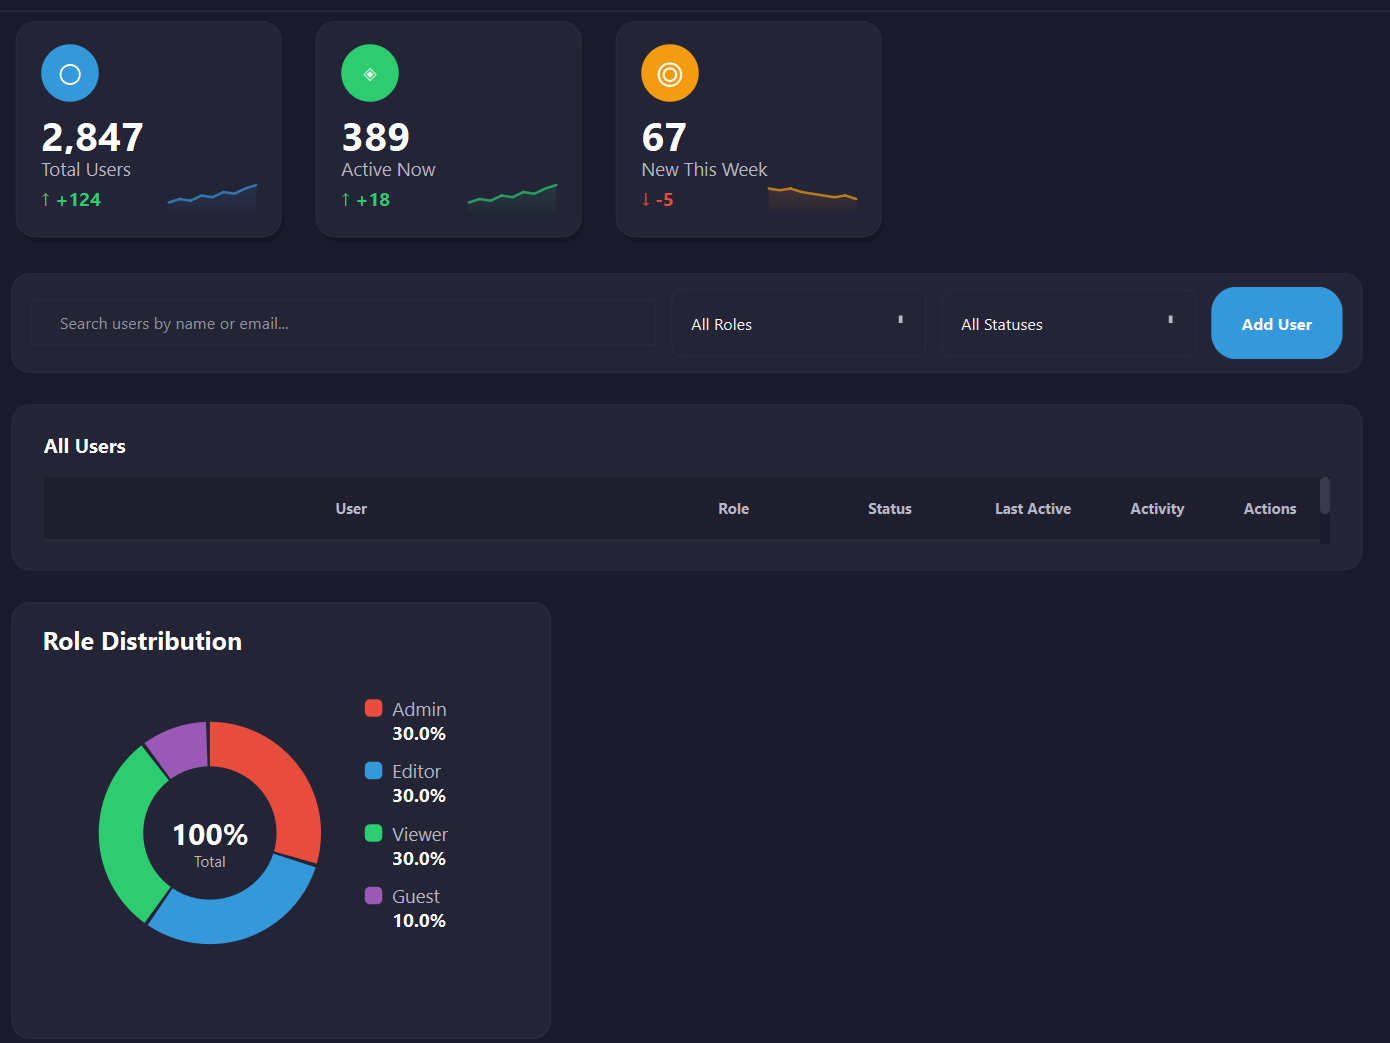
The dashboard isn’t a toy. It’s a modern, dark-themed analytics application with multiple pages, custom-painted stat cards, line charts, donut charts, sidebar navigation, a breadcrumb trail, and six swappable color themes: dark, cyberpunk, nord, ocean breeze, forest, and purple.
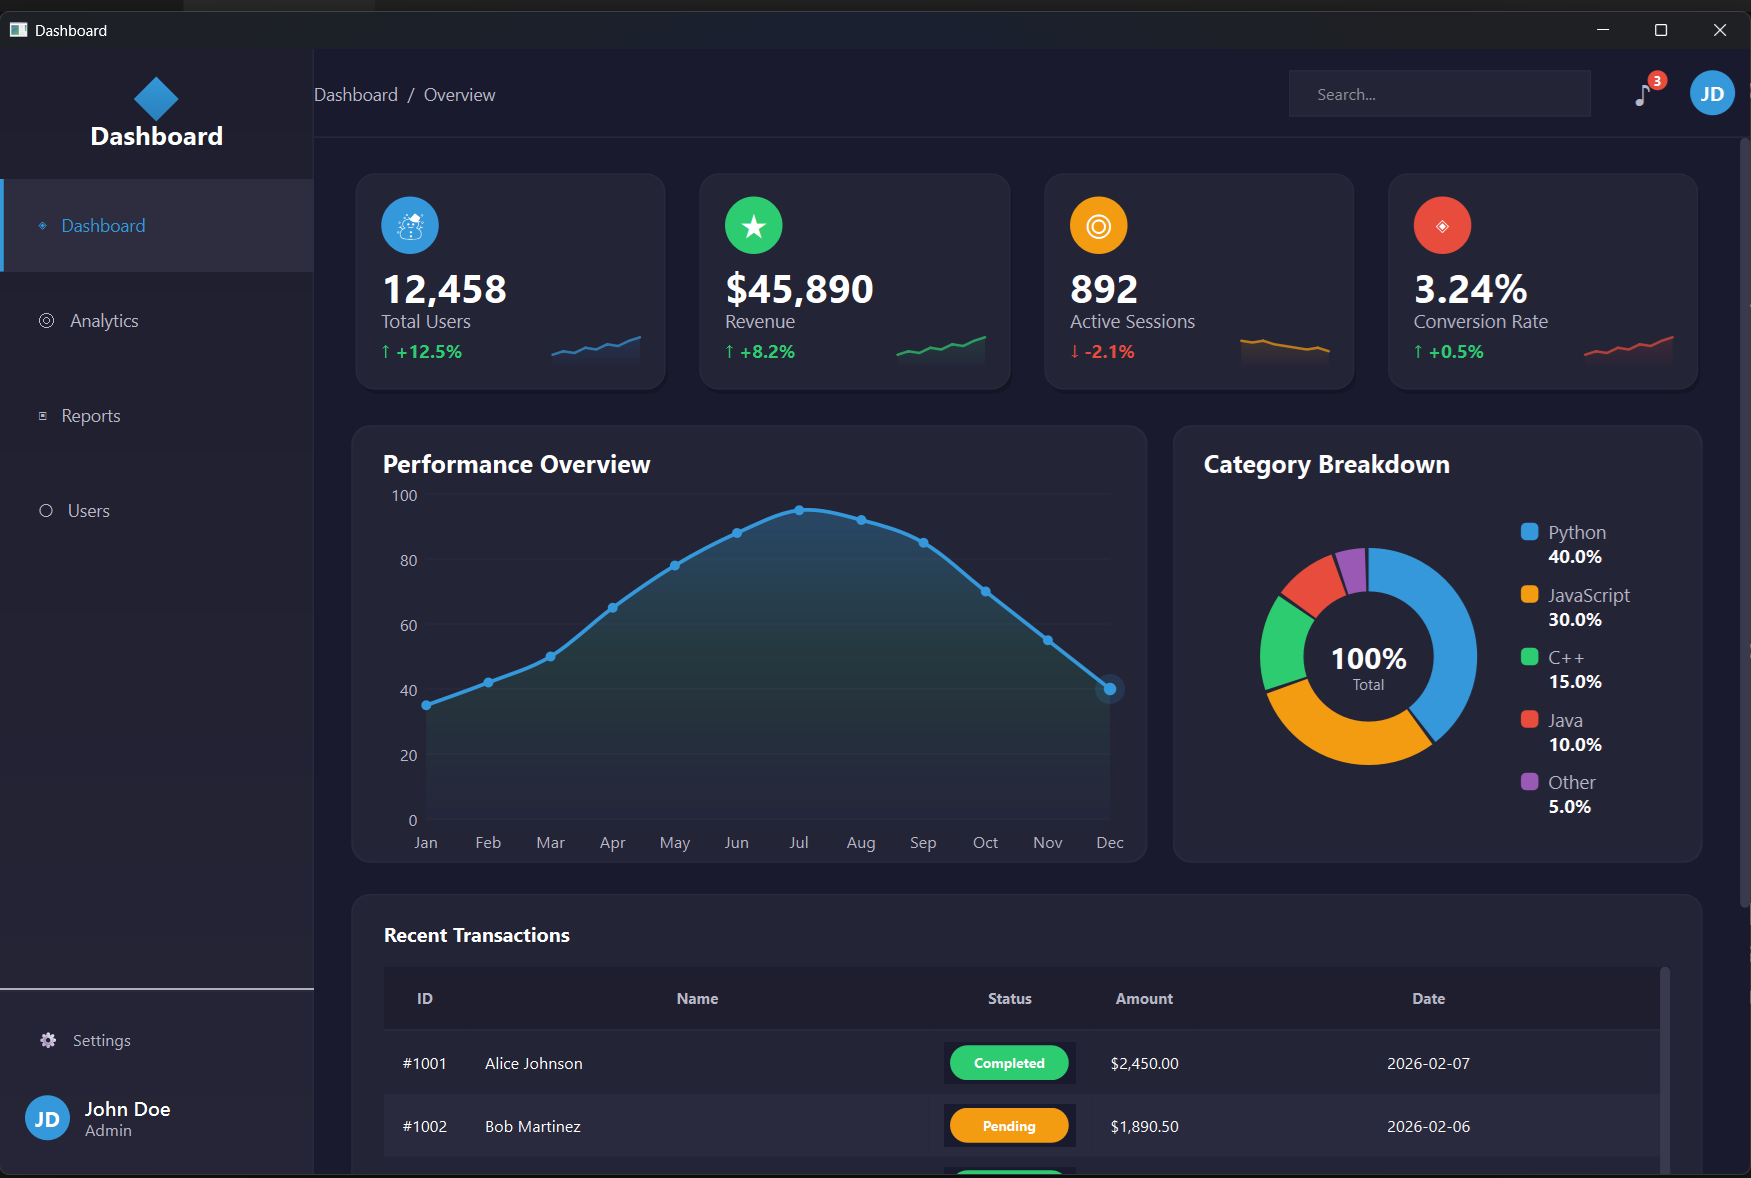
Here’s the Qt Widgets C++ version running in its default dark theme:
And the same app with the purple theme applied — a completely different look without touching a line of application logic:
The app has three pages: Analytics, Reports, and Users. Each one uses the same sidebar-based navigation pattern, and adding a new page teaches you exactly how Qt’s layout and navigation systems work in that particular technology.
The Three Technologies, Side by Side
Qt Widgets with C++
Qt Widgets is the original Qt UI framework. It’s been around since the early 1990s, and the applications built with it (KDE, Qt Creator itself, VirtualBox) are a testament to how mature and capable it is. When you open a Qt Widgets project in Qt Creator, you get a CMakeLists.txt, a mainwindow.h, a mainwindow.cpp, and a main.cpp. Everything is C++. Everything is compiled.
The project structure for the dashboard looks like this:
qt-widgets-cpp/
├── CMakeLists.txt
├── src/
│   ├── main.cpp
│   ├── mainwindow.{h,cpp}
│   ├── pages/
│   │   ├── analyticspage.{h,cpp}
│   │   ├── reportspage.{h,cpp}
│   │   └── userspage.{h,cpp}
│   ├── widgets/
│   │   ├── sidebar.{h,cpp}
│   │   ├── statcard.{h,cpp}
│   │   └── chartwidget.{h,cpp}
│   └── utils/
│       └── thememanager.{h,cpp}
└── resources/
    └── styles/
        └── (6 QSS theme files)
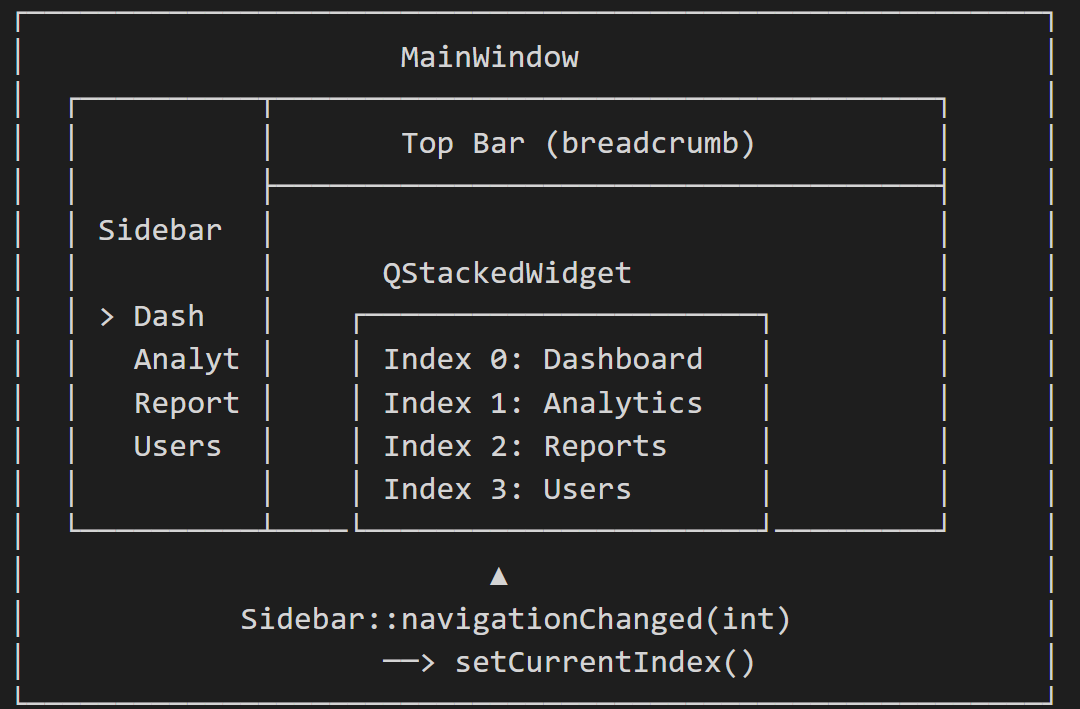
The architecture here is cleanly separated:
Theming works through two systems working in concert. The first is QSS (Qt Style Sheets), a CSS-like language that controls the look of standard Qt widgets. Switching themes is a matter of loading a different .qss file:
// In ThemeManager::applyTheme()
QFile styleFile(":/styles/dark-theme.qss");
styleFile.open(QFile::ReadOnly | QFile::Text);
app->setStyleSheet(QLatin1String(styleFile.readAll()));
The second system is a Colors struct in the ThemeManager that holds programmatic colors for custom-painted widgets like the stat cards and charts, which QSS can’t fully style. Together they give you complete visual control.
The stat cards are drawn using QPainter inside a paintEvent() override. It’s the kind of code that takes a little getting used to if you’re coming from a web background, but once it clicks, you have pixel-perfect control over every rendered element.
Creating a new page means writing a header file, a source file, updating CMakeLists.txt, registering it with the QStackedWidget in mainwindow.cpp, and adding a button to the sidebar. Five touch points, about 80 lines. It’s the most mechanical part of the Widgets workflow, and it’s worth knowing upfront.
Qt Widgets with PySide6
PySide6 is the official Python binding for Qt. The API is almost identical to the C++ version, but you’re writing Python, which means no header files, no compilation step, and pip install PySide6 instead of a C++ toolchain setup.
The project structure mirrors the C++ version closely:
qt-widgets-pyside/
├── main.py
├── mainwindow.py
├── widgets/
│   ├── sidebar.py
│   ├── statcard.py
│   └── chartwidget.py
├── pages/
│   ├── analyticspage.py
│   ├── reportspage.py
│   └── userspage.py
├── utils/
│   └── thememanager.py
└── styles/
    └── (6 QSS theme files)
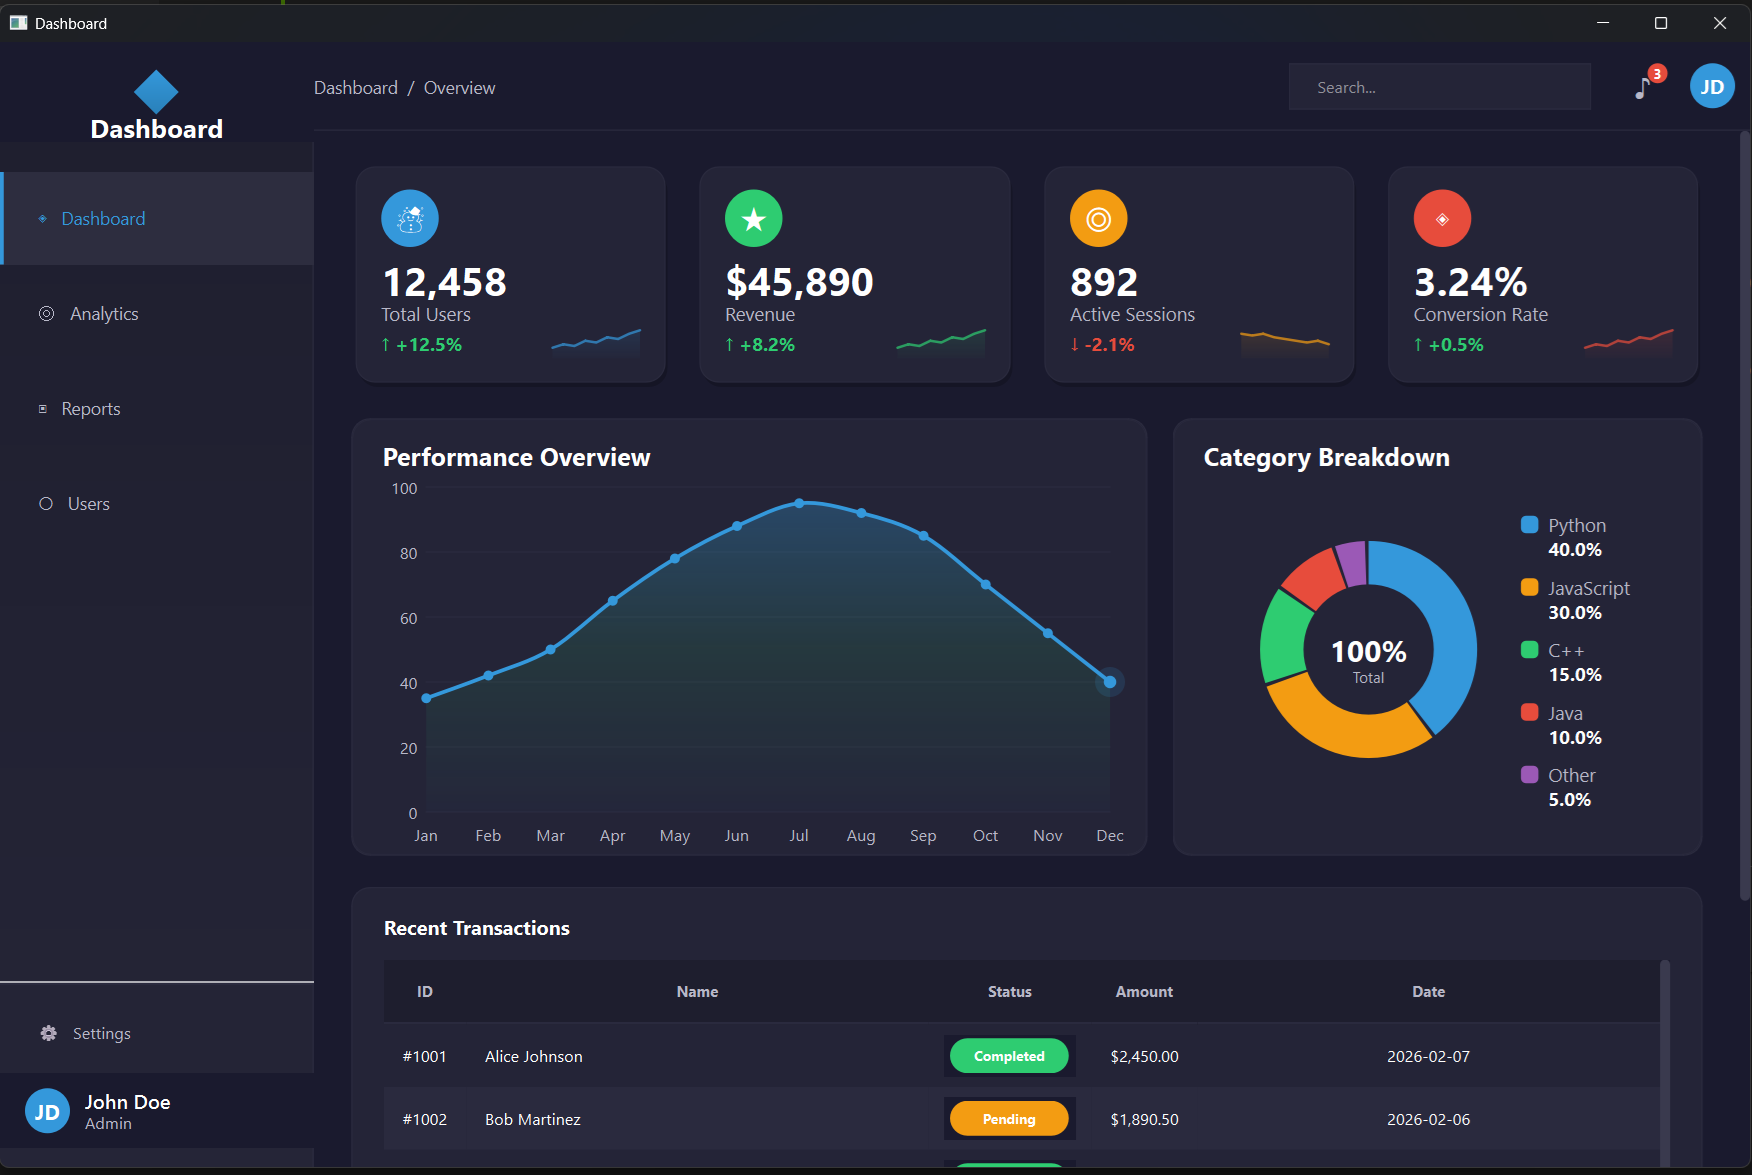
Here’s the PySide6 dashboard on first run:
Switching themes is as simple as commenting in the right filename in thememanager.py and restarting the script. No rebuild required. That last part is the thing you notice immediately. The feedback loop is fast. Edit a file, run python main.py, and you see the result in seconds.
Adding a new page in Python means creating one file (settingspage.py), then adding two lines to mainwindow.py and one line to sidebar.py. Three files, roughly 40 lines. Noticeably lighter than the C++ version.
The trade-off is honest: you lose the compile-time safety net. Python won’t tell you at build time that you passed the wrong type to a method. It’ll tell you at runtime, if you happen to trigger that code path. For most internal tools and prototypes, this is completely fine. For safety-critical production software, you start to miss your compiler.
Qt Quick / QML
QML is the declarative UI language Qt introduced for modern, fluid, touch-friendly interfaces. Instead of describing how to build a UI (allocate this widget, add it to this layout, wire this signal) you describe what the UI looks like, and the QML engine handles the rest. It’s a different mental model, and it takes a little adjustment, but once it settles in, it feels remarkably natural.
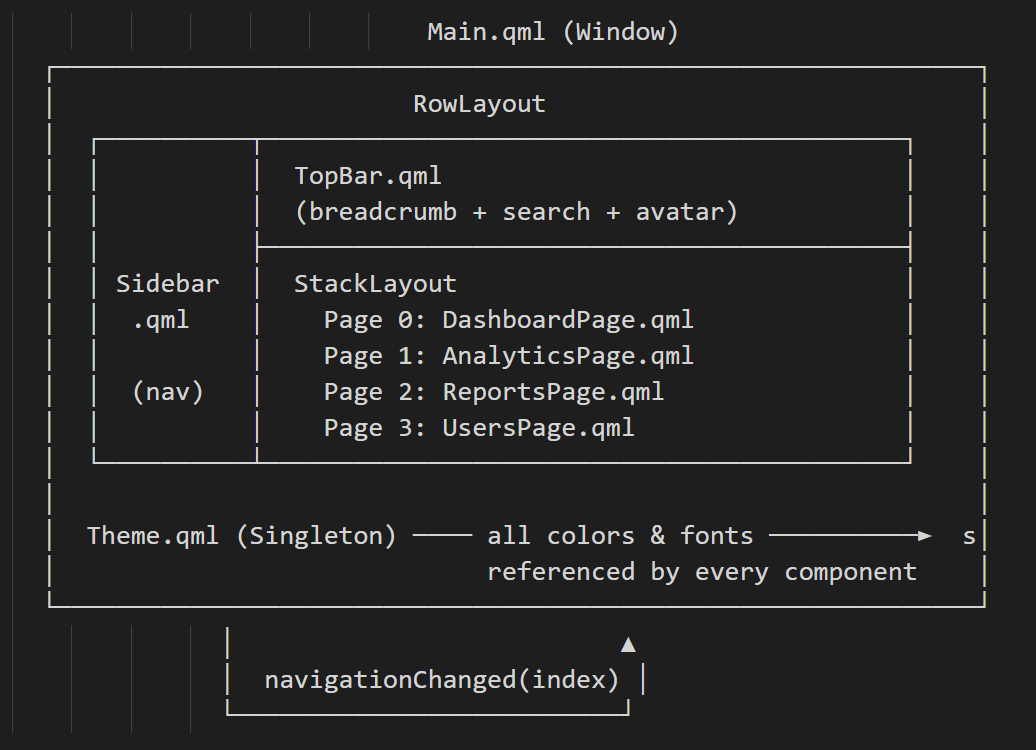
The QML dashboard project structure:
qt-qml/
├── CMakeLists.txt
├── src/
│   ├── main.cpp
│   └── chartmodels/
│       ├── linechartitem.{h,cpp}
│       └── donutchartitem.{h,cpp}
└── qml/
    ├── Main.qml
    ├── Theme.qml
    ├── components/
    │   ├── Sidebar.qml
    │   ├── TopBar.qml
    │   ├── StatCard.qml
    │   └── DataTable.qml
    └── pages/
        ├── DashboardPage.qml
        ├── AnalyticsPage.qml
        ├── ReportsPage.qml
        └── UsersPage.qml
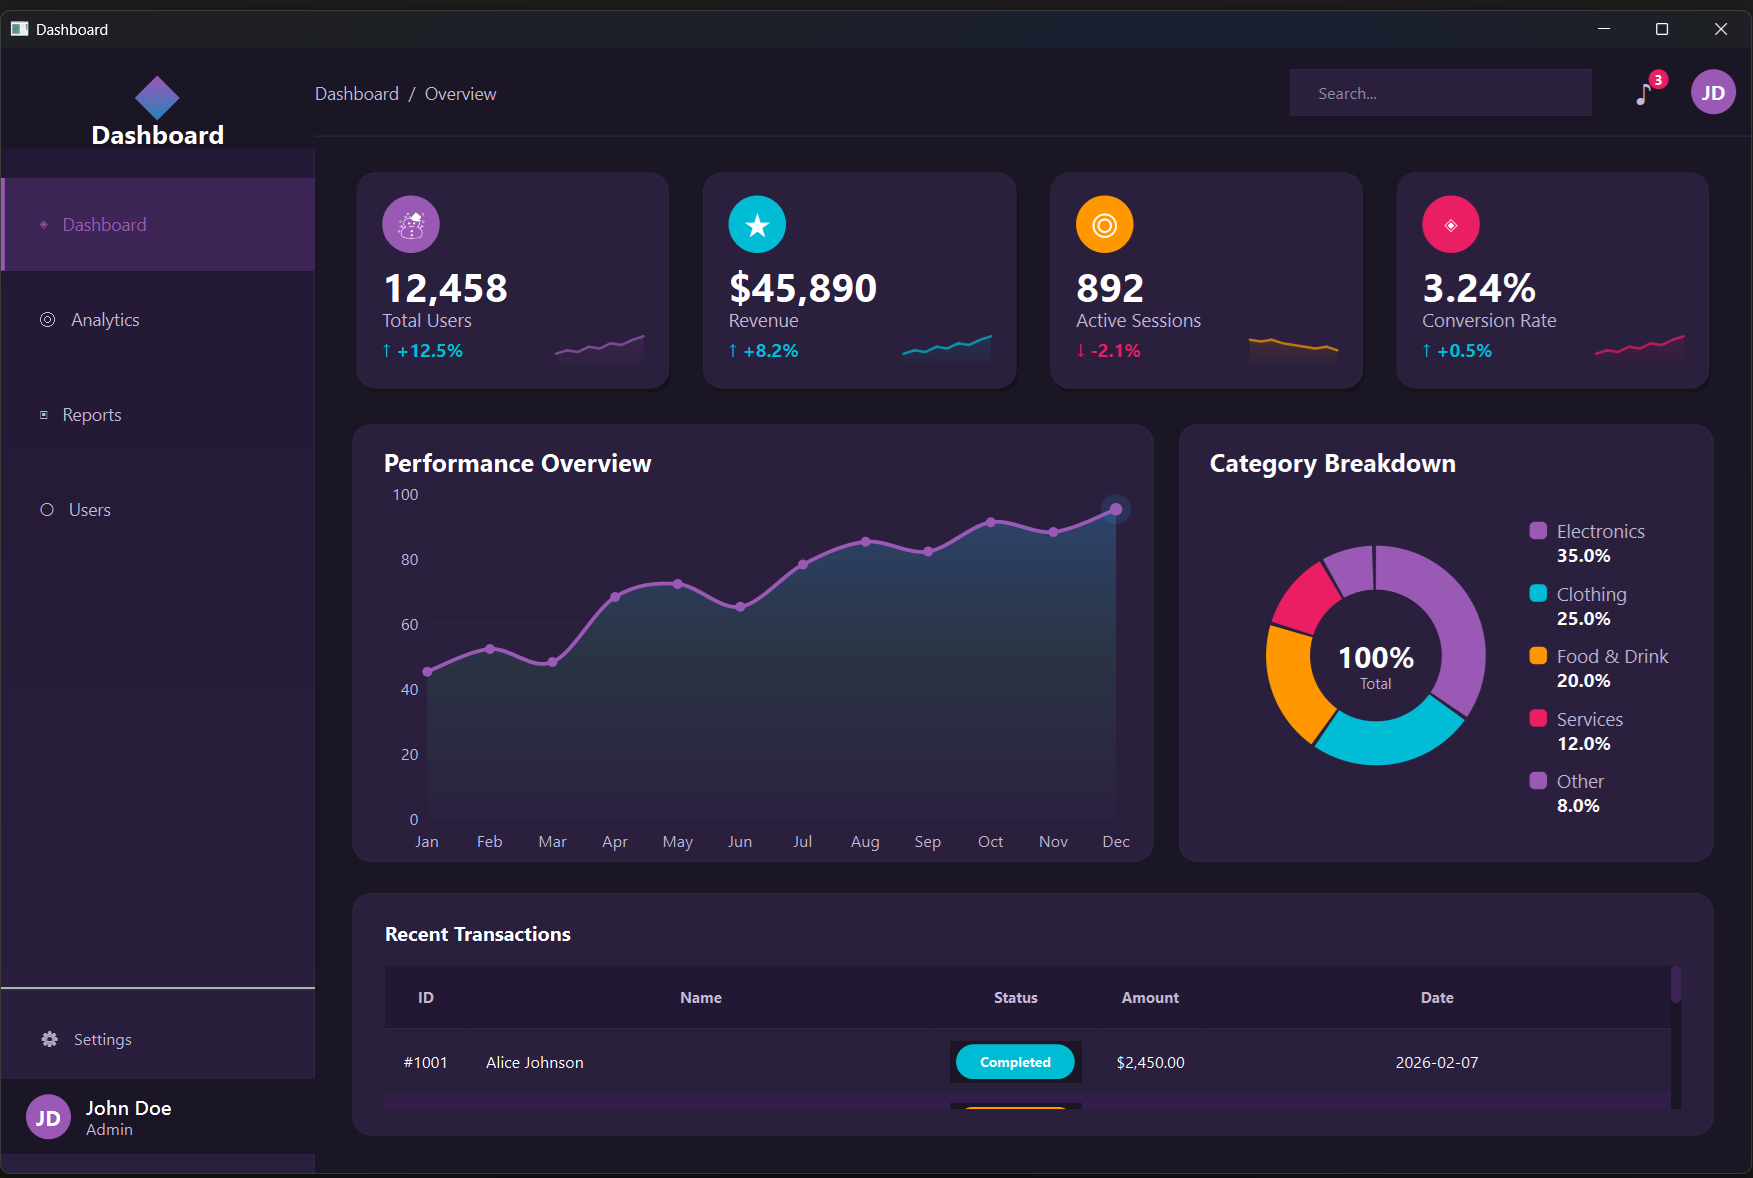
The QML version running for the first time:
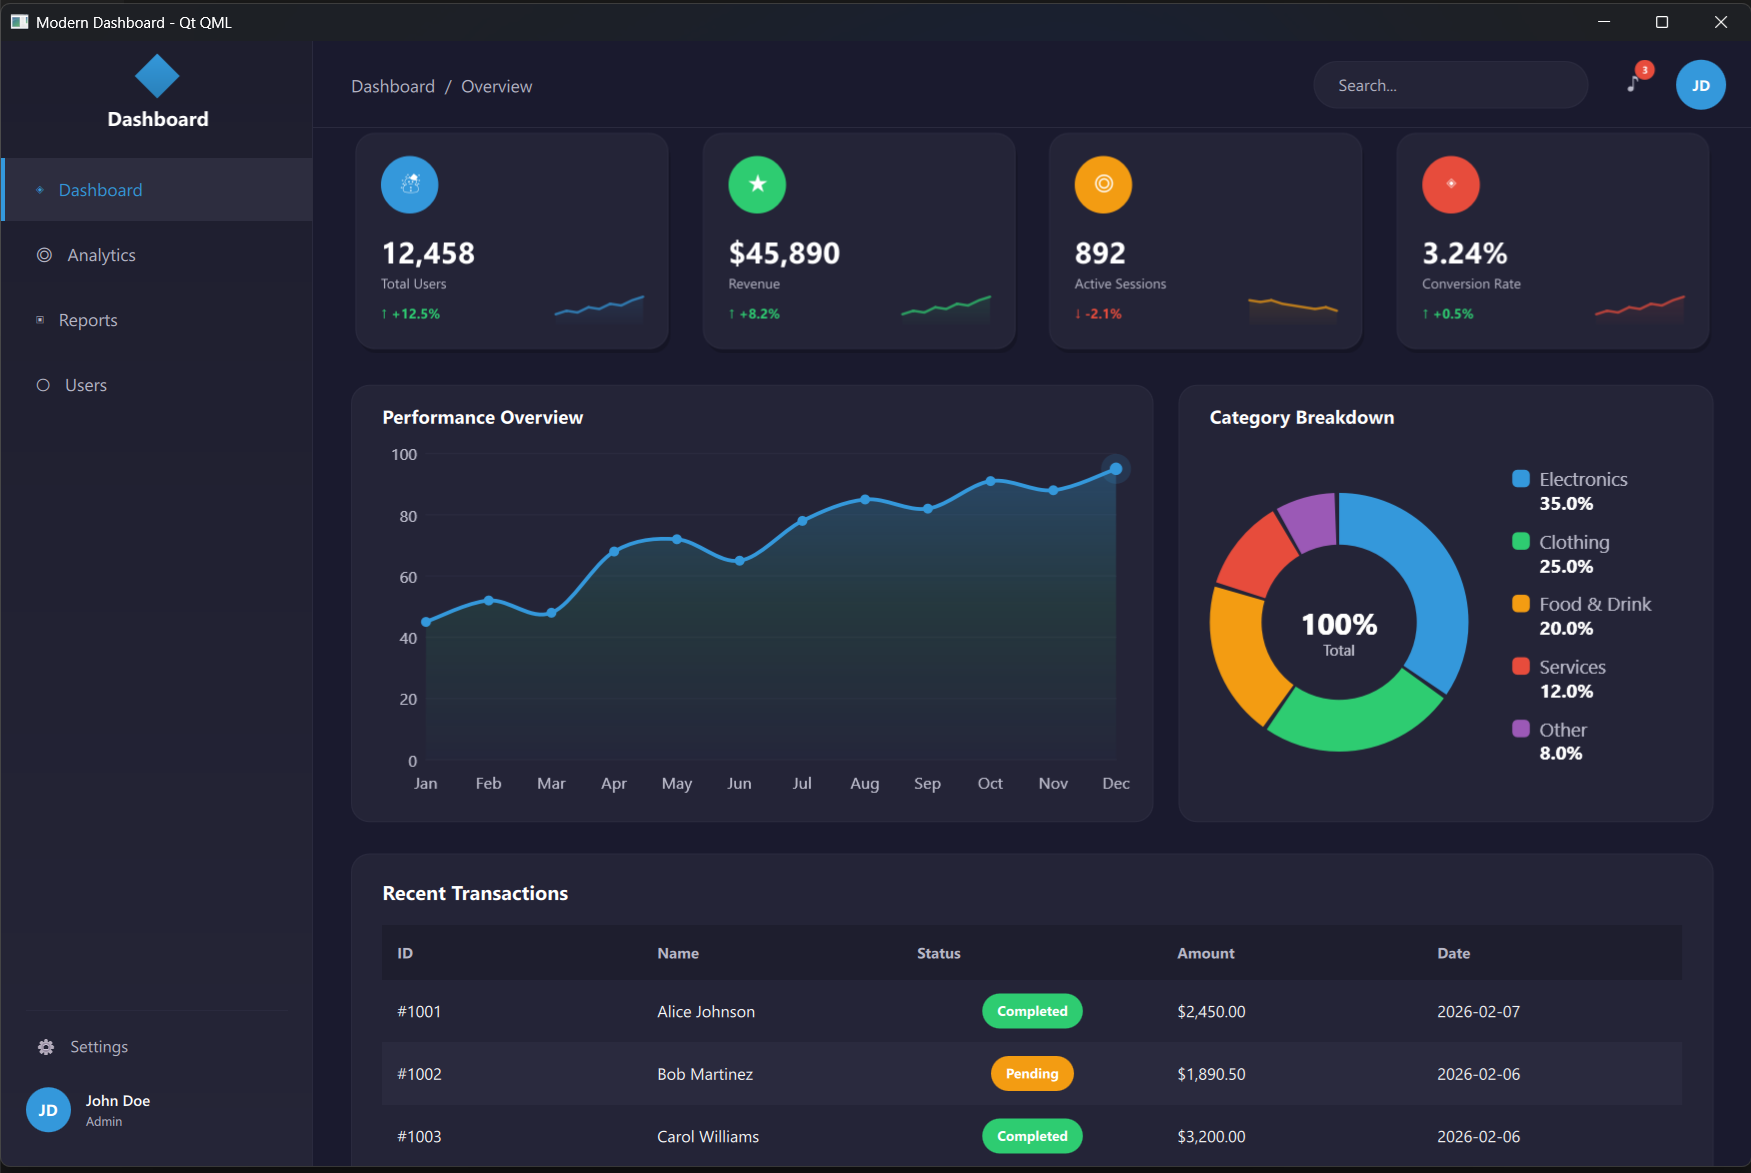
The thing that immediately stands out with QML theming is Theme.qml: a singleton with readonly property color definitions that every component reads from. Switch the active color block and every component updates automatically through property bindings. In the Widgets versions, theming is split across a QSS file and a Colors struct, but that’s a convenience choice rather than a hard Qt requirement. You could consolidate everything into the stylesheet if you wanted.
Declaring a stat card in QML looks like this:
StatCard {
    iconChar: "\u2603"
    title: "Total Users"
    value: "12,458"
    change: "+12.5%"
    positive: true
    accentColor: Theme.accentBlue
}
Compare that to the C++ version:
auto *card = new StatCard("\u2603", "Total Users", "12,458",
                           "+12.5%", true, QColor("#60a5fa"), container);
Both work. The QML version just reads like a description of what you want. The C++ version reads like an instruction to a computer. Neither is wrong, but they feel different.
Adding a new page in QML means one QML file, two lines in CMakeLists.txt, and small additions to Main.qml and Sidebar.qml. Four files, about 30 lines. The slimmest of the three.
The Takeaways
After building the same application three times, a few things become undeniable.
The edit-run loop matters more than you think. PySide6 wins here, obviously. You edit a file and run the script. No waiting. With C++ Widgets and QML, you’re rebuilding, and those seconds accumulate across a day of iteration. For rapid prototyping and exploratory work, Python’s feedback loop is a genuine advantage.
QML makes property bindings a first-class citizen. Theme.qml is a singleton that every component reads from, and swapping the active color block automatically propagates through the entire UI. You achieve the same result in Qt Widgets, it just takes some manual wiring on your part.
But QML has a learning curve. The declarative mental model, signal handlers, property bindings, Flickable vs. ScrollView, StackLayout vs. StackView: there’s a vocabulary to learn before you’re productive. Widgets are more immediately approachable, especially for developers coming from traditional desktop frameworks.
C++ Widgets is the established choice for desktop applications. It’s the foundation for serious desktop software — KDE, Qt Creator itself — and it shines there. It’s not the right tool for mobile or embedded targets where QML was purpose-built to excel.
QML reaches further than desktop. It’s optimized for touch interfaces, animations, and embedded and mobile targets. That said, plenty of desktop applications are built with QML too — it’s a capable UI layer wherever you need it, and it’s the direction Qt is clearly investing in.
PySide6 is underrated for internal tooling. If your audience is a data science team, a research group, or internal users who don’t care what framework you used, PySide6 gets you to a real application faster than almost anything else. pip install PySide6, open VS Code, and you’re building.
Here’s the honest side-by-side comparison on adding a new page:
| Technology | Files Changed | Approx. Lines |
|---|---|---|
| Qt Widgets C++ | 5 | ~80 |
| Qt Widgets PySide6 | 3 | ~40 |
| Qt Quick QML | 4 | ~30 |
None of those numbers should scare you. But knowing them going in sets realistic expectations.
What the Book Covers
The book walks you through all three implementations from zero. Not a high-level overview. You actually open Qt Creator (or VS Code for PySide6), run each project, make the customizations, add a new page yourself, and understand why every piece of the architecture is where it is.
Each technology chapter covers:
- Opening and running the project
- Switching between all six themes
- Changing accent colors
- Replacing stat card presets
- Modifying chart data
- Adding a completely new page with sidebar navigation
The final chapter puts all three side by side on every axis that matters: workflow, theming, page creation, feature comparison. So you can make a grounded technology choice rather than a guess.
The source code for all three projects is included. You’re not reading about dashboards. You’re building them.
Your Next Steps
If you’ve been sitting on the fence about Qt, maybe you’ve done a tutorial or two, maybe you’ve read the docs but haven’t committed to building something real, this is the project that gets you off the fence.
You come out the other side knowing what Qt Widgets C++ development actually feels like. What it costs in boilerplate, what it gives you in performance and control. You know what PySide6 feels like: the speed, the flexibility, the Python trade-offs. You know what QML feels like: the declarative style, the property bindings, the elegant theming. And you know which one felt most like yours.
Grab the book at https://www.learnqt.guide/ebook, spend a weekend with all three, and make the call yourself.
Happy coding!
Qt6 QML For Beginners Book
Master the fundamentals of Qt6 QML development with this comprehensive 400+ page guide. Learn declarative UI programming from scratch with real-world examples and cross-platform development techniques.
Qt6 QML Advanced - C++ Integration
Take your Qt6 QML skills to the next level with advanced C++ integration techniques. 350+ pages covering QML-C++ integration, performance optimization, and advanced patterns for production-ready applications.

Desktop Apps with Qt Widgets and C++
Master professional desktop application development using Qt Widgets and modern C++. 40+ hours of content with 5+ real projects. Perfect for beginners to intermediate developers.
Desktop Apps with Qt Widgets and PySide6
Learn to build powerful desktop applications using Qt Widgets and Python. 35+ hours of hands-on content with 4+ real-world projects to boost your Python GUI skills.
Qt QML From Beginner to Pro
Master modern UI development with Qt QML and Qt Quick. 50+ hours of comprehensive training with 6+ real projects. Build fluid, dynamic interfaces for desktop, mobile, and embedded devices.
Multi-Threading and IPC with Qt C++

Harness the power of multi-threading and inter-process communication in Qt. 8-12 hours of intensive training with 6+ hands-on demos. Take your Qt C++ skills to the next level.