Stop Building Qt Releases by Hand: Automate Releases for Windows, macOS, and Linux with GitHub Actions
If you’ve been following along with the deployment side of Qt development, you know the drill by now. You run cmake --install, then linuxdeploy or macdeployqt or cpack, by hand, on your own machine, one platform at a time.
It works. It also means every release depends on you remembering the right sequence of commands, having access to a Linux box, a Mac, and a Windows machine, and doing the whole thing again for the next version.
This post walks through replacing that with a GitHub Actions pipeline that does it for you. The promise is simple, you push a tag like host-v1.2.0, and a few minutes later there’s a GitHub Release with a Linux AppImage, a DEB package, a tar.gz, a macOS tar.gz for both Apple Silicon and Intel, a Windows ZIP, and a Windows installer.
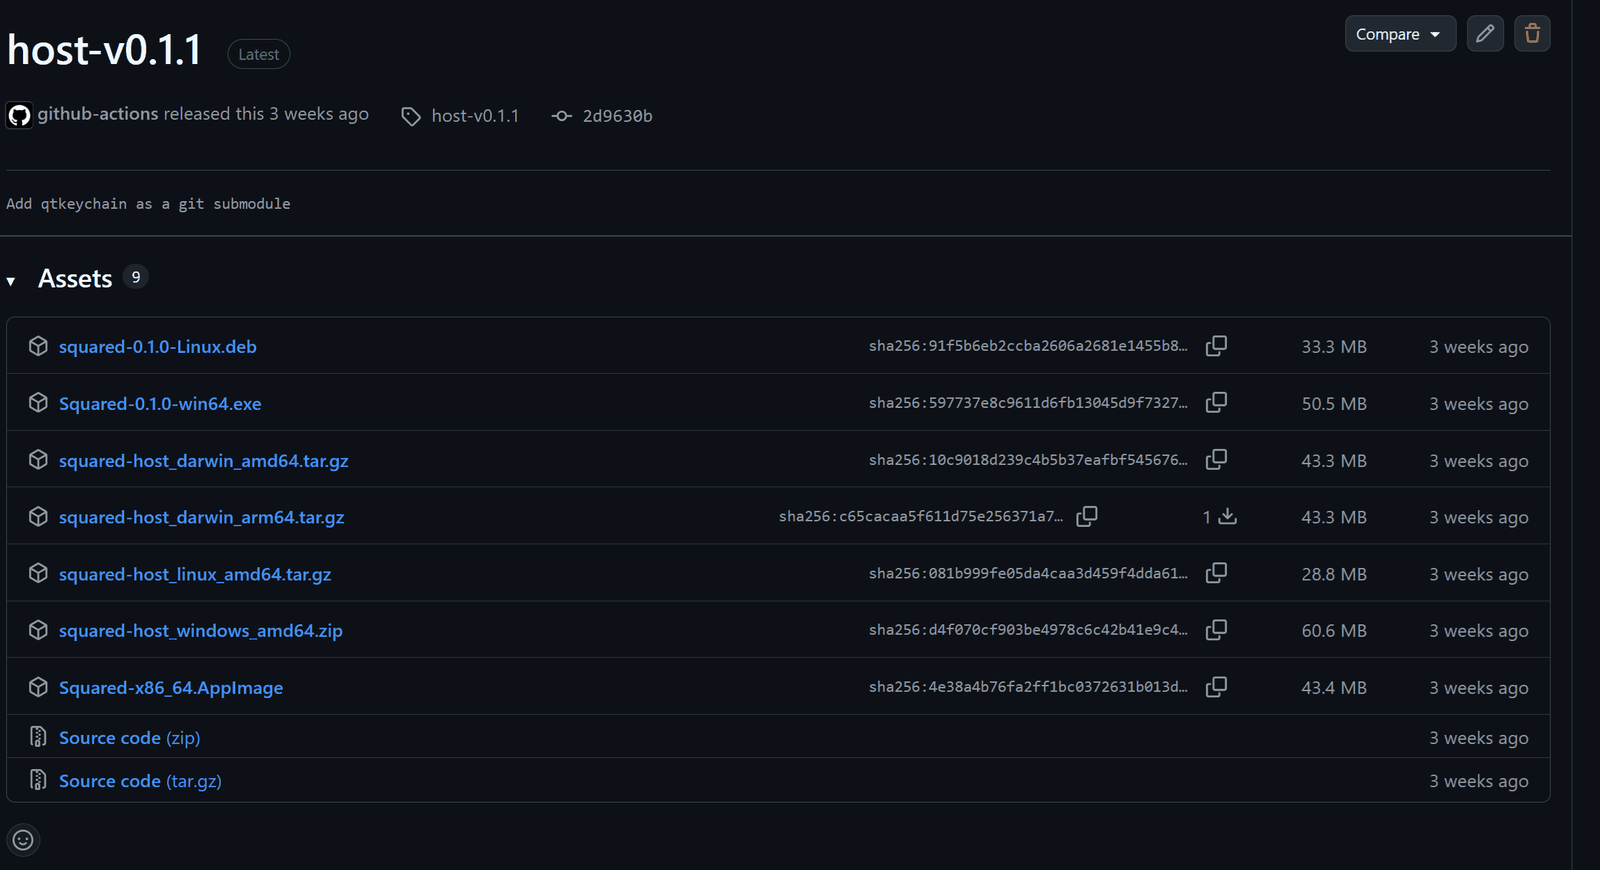
Here’s how it looks in practice:
                        git tag host-v1.2.0
                        git push origin host-v1.2.0
                                  │
                                  ▼
                     ┌────────────────────────┐
                     │   GitHub Actions sees   │
                     │  a tag matching host-v* │
                     └────────────┬───────────┘
                                  │
                 ┌────────────────┴────────────────┐
                 ▼                                  ▼
          build-linux job                   build-desktop job
        (Ubuntu + Docker)                  (matrix: 2x macOS, 1x Windows)
                 │                                  │
        tar.gz · DEB · AppImage         tar.gz x2 · ZIP · NSIS installer
                 │                                  │
                 └────────────────┬─────────────────┘
                                  ▼
                     One GitHub Release page
                        7 downloadable files
This is the pipeline built for Squared, a real cross-platform Qt 6 QML app, as part of my Qt QML Cross-Platform Deployment course. You don’t need to be a student from that course to follow along though. The whole workflow is available from the project GitHub repository. In the following, we will be reproducing the workflow file from that repository, step by step, explaining what each part does and why it matters.
What CI/CD Actually Is
“CI/CD” gets thrown around a lot, so let’s strip the acronym down. It stands for Continuous Integration / Continuous Delivery. Instead of a person manually building and packaging software, a server does it automatically, the same way, every time, triggered by something you did anyway, like pushing code. “Continuous Integration” is the automatic building-and-testing half. “Continuous Delivery” is the automatic packaging-for-release half. This post is really about the CD side. We already know the app builds; we want it packaged and published without touching a keyboard on three (ore more) different computers.
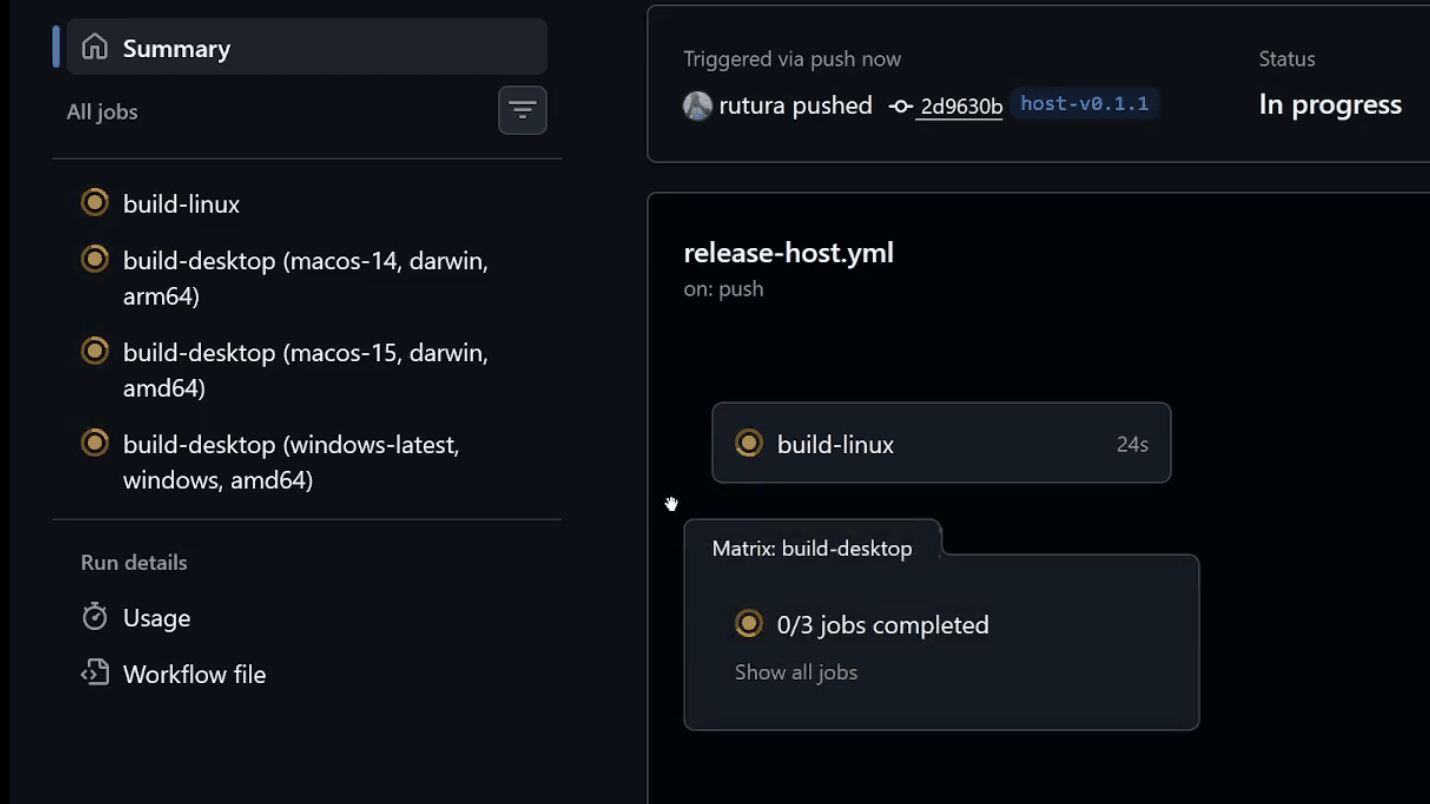
We’re using GitHub Actions, GitHub’s own built-in automation system, because Squared’s code already lives on GitHub. Other CI providers exist (Jenkins, CircleCI, GitLab CI), but GitHub Actions is already sitting there, reading the same repository, free for public repos and available for a fee for private ones.
Five Foundational Concepts
GitHub Actions has five terms that show up constantly. Let’s define them clearly before we dive into the mechanics of automating the release of our Qt 6 QML app:
- Event: something that happens to the repository, like a push, a pull request, or a new tag. This is the trigger. In this example, we will explicitly trigger the workflow by pushing a tag that matches
host-v*. More on that later. - Workflow: the automation you define, as a YAML file. In this example, the workflow is a single file called
release-host.ymlthat reacts to the event above. One event can trigger one workflow, or several. - Job: a workflow is made of one or more jobs. In our example, the workflow has two jobs: one for Linux, and one for macOS + Windows. Each job gets its own fresh machine to run on. Jobs can run in parallel or wait on each other.
- Step: a job is a sequence of steps, run in order, on that same machine. A step is either a shell command or a reusable action (a packaged, reusable unit of work someone else wrote, more on this below).
- Runner: the actual machine. A fresh Linux, Windows, or macOS virtual machine that GitHub spins up, runs your steps on, and throws away afterward.
If you chain all of these together, you stand a better chance to understand the whole model:
  EVENT                WORKFLOW              JOB                   STEP
"push a tag"  ──▶  "one YAML file"  ──▶  "one per platform"  ──▶  "one command
                                          runs on its own            each,
                                             runner"              in order"
An event triggers a workflow. A workflow runs one or more jobs. Each job runs on its own runner, executing a sequence of steps. Everything from here is just filling in our event, our jobs, and our steps.
Translated into what we actually want:
- Event: pushing a tag matching
host-v*. - Workflow: one YAML file that reacts to that event.
- Jobs: one for Linux, one for macOS and Windows together (via a matrix, explained below), running in parallel since neither depends on the other.
- Steps: checkout the code, install Qt, configure, build, install, package, upload. The exact same commands you’d type by hand, just running on hosted runners instead of your own machine.
Note: The bulk of the post will explain the main YAML workflow file and we will run it towards the end to see the results. This note is a heads-up to those of you that are not patient! I know there’s a lot of us :-)
Creating the Workflow File
I am going to assume that you have a project ready to build, and that you can build it locally on Linux, macOS, and Windows. The project should also be in a GitHub repository, because GitHub Actions only runs on GitHub. I would recommend cloning the Squared repository and changing to the course/ci branch, which has the workflow file already in place, so you can see a working example.
git clone https://github.com/learnqtkenya/SquaredApp.git
git branch course/ci
This will give you a local copy of the repository with the workflow file already in place. You can use those files as a reference to follow along.
GitHub looks for workflow files in one exact path: .github/workflows/, at the repository root. Any .yml file placed there is picked up automatically. You can create such a directory with the following command:
mkdir -p .github/workflows
After that, you would create create a file called release-host.yml inside it. Again, you can find the full workflow file here.:
name: Release Host Binary

on:
  push:
    tags:
      - "host-v*"

permissions:
  contents: write
on.push.tags defines the event. If you push a tag matching host-v* (host-v0.1.0, host-v1.2.3, anything starting with host-v) GitHub Actions will automatically run this workflow. Nothing else triggers it. Not a push to main, not a pull request.
The permissions block grants contents: write. Every workflow run gets a temporary token for talking back to GitHub’s API, and by default that token is read-only. We need write access because later steps create a GitHub Release and upload files to it. Without this line, the upload step would fail on us.
The workflow has two jobs: build-linux, which runs inside a Docker container with Qt pre-installed, and build-desktop, a matrix (a blueprint for a job that GitHub instantiates once per entry in a list of values you give it, here one copy for macOS and one for Windows, more on this later) that covers macOS Apple Silicon, macOS Intel, and Windows. They run in parallel. Nothing about the Linux artifacts depends on the macOS or Windows ones.
The Linux Job: Building Inside a Container
GitHub’s ubuntu-24.04 runner is a clean Ubuntu virtual machine. It doesn’t have Qt installed and has nothing project-specific. There are two ways to get Qt onto it: install it as a step, or run the job inside a container that already has it. We pick the second for this Linux job.
A quick primer if containers are new to you: Docker packages an application together with everything it needs (libraries, tools, an entire filesystem) into a single portable unit called an image, and runs it in an isolated environment called a container. Instead of installing Qt fresh on a bare Ubuntu machine every single run, we can point at an image that already has Qt built in and start from there.
build-linux:
  runs-on: ubuntu-24.04
  container:
    image: carlonluca/qt-dev:6.8.3
runs-on: ubuntu-24.04 still requests the virtual machine, same as any job. container.image tells Actions to pull carlonluca/qt-dev:6.8.3 from Docker Hub (Docker’s public registry of images) and run every subsequent step inside it. It’s a community-maintained image, not an official Qt or GitHub image, that ships Qt 6.8.3 (at the time of this writing) pre-built under /opt, including a desktop build, an Android build, and others side by side. We only need the desktop one.
Checkout, System Dependencies, Configure
Nothing runs without the source code, and GitHub does not clone your repository into a job automatically. That’s the first step, every time:
steps:
  - uses: actions/checkout@v4
    with:
      submodules: recursive
actions/checkout is GitHub’s official action (a ready-made, reusable step, explained fully below) for cloning your repo at the commit that triggered the workflow. submodules: recursive matters specifically here. Squared pulls in external/qtkeychain as a git submodule (a separate git repository embedded inside this one), and a plain clone leaves that directory empty. Every job runs with $GITHUB_WORKSPACE already set, and checkout puts the code exactly there, so no step in this whole pipeline ever needs to cd into the project first. That means that we can directly get to running commands that assume we are at the root of the repository, like cmake -G Ninja -B build. But we’ll do that later. We start by installing the system dependencies the container doesn’t already include:
- name: Install system dependencies
  run: apt-get update && apt-get install -y libsecret-1-dev curl file
apt-get is Ubuntu’s package manager, used here to install packages the Docker image doesn’t already include. libsecret-1-dev is needed because Squared’s SecureStorage links against libsecret on Linux. curl (a command-line tool for downloading files over HTTP) and file (a tool that identifies file types) are needed later by linuxdeploy.
Then comes configuration part:
- name: Configure
  run: |
    QT_PREFIX=$(find /opt -type f -path "*/gcc_64/lib/cmake/Qt6/Qt6Config.cmake" -exec dirname {} \; | sed 's#/lib/cmake/Qt6$##' | head -1)
    test -n "$QT_PREFIX" || { echo "No desktop Qt kit found"; exit 1; }
    test -f "$QT_PREFIX/lib/cmake/Qt6DBus/Qt6DBusConfig.cmake" || { echo "Qt6DBus missing in $QT_PREFIX"; exit 1; }

    cmake -G Ninja -B build \
      -DCMAKE_BUILD_TYPE=Release \
      -DCMAKE_PREFIX_PATH="$QT_PREFIX" \
      -DCMAKE_INSTALL_PREFIX=install
CMake is the build system generator our project is using. It doesn’t compile anything itself. It reads CMakeLists.txt and generates the actual build files for whichever tool will do the compiling, in this case Ninja, a small, fast build tool designed to just run the compiler steps as quickly as possible once CMake has figured out what needs building.
The Docker image has Qt somewhere under /opt, but the exact path varies by image version, and we don’t control that image. So this finds it at run time instead of hardcoding it. Worth unpacking piece by piece:
/opt/qt/6.8.3/
├── gcc_64/                              ◀── desktop Linux build (what we want)
│   └── lib/cmake/Qt6/Qt6Config.cmake
├── gcc_arm64/                           ◀── other SDKs in the same image
│   └── lib/cmake/Qt6/Qt6Config.cmake
└── android_x86/
    └── lib/cmake/Qt6/Qt6Config.cmake
find /opt -type f -path "*/gcc_64/lib/cmake/Qt6/Qt6Config.cmake". Bakinggcc_64(the desktop Linux build’s directory name) directly into the search pattern means it only ever finds the desktop kit shown above, never the Android one sitting right next to it in the same image.-exec dirname {} \;.dirnamestrips a filename off a path, leaving just the containing directory. This runs it on each match as part of the samefindcommand.sed 's#/lib/cmake/Qt6$##'.sedis a stream editor for text substitution. The path at this point looks like/opt/qt/6.8.3/gcc_64/lib/cmake/Qt6. This strips the trailing/lib/cmake/Qt6in one precise cut, leaving/opt/qt/6.8.3/gcc_64, the real Qt prefix.head -1. A safety net in case more than one desktop Qt version ever exists in the same image.- The
testguards. Fail loudly and immediately if the image’s layout ever changes, instead of handingcmakean emptyCMAKE_PREFIX_PATHand failing confusingly several steps later. The second guard specifically checks forQt6::DBus, which Squared requires for desktop integration, catching a mismatched Qt install before spending minutes compiling against it.
Once the project is configured, we have a build/ directory with Ninja build files, and an install/ directory that will eventually hold the final release layout. The next two steps actually compile and install the app. The same things you would do by hand on your own machine, but now running automatically in the CI environment:
- name: Build
  run: cmake --build build --target Squared --parallel

- name: Install
  run: cmake --install build
cmake --install runs the deploy script qt_generate_deploy_qml_app_script generated during configure: it copies the binary, Qt’s shared libraries, the platform plugin, the QML modules, generates qt.conf, and patches RPATH (the lookup path a Linux binary uses to find its shared libraries at runtime). After the build and install steps, the install/ directory is a complete, runnable Linux application.
Trimming Dead Weight
The application files in install/ are complete, but not all of them are actually needed. Our application only uses the Basic Quick Controls style, but Qt’s deploy script copies every style it finds into the install tree. That means the other styles (Fusion, Material, Imagine, FluentWinUI3, Universal) are just taking up space and will never be loaded by the app. The Trim install step removes these unused styles and their compiled libraries, as well as two plugin directories that are not needed in a release build.
- name: Trim install
  run: |
    cd install
    for style in FluentWinUI3 Material Imagine Fusion Universal; do
      rm -rf qml/QtQuick/Controls/$style
      rm -f lib/libQt6QuickControls2${style}* lib/libQt6QuickControls2${style}StyleImpl*
    done
    rm -rf plugins/qmltooling plugins/egldeviceintegrations
  before trim                       after trim
  install/qml/QtQuick/Controls/     install/qml/QtQuick/Controls/
  ├── Basic/          (used)        └── Basic/
  ├── Fusion/         (unused) ✗
  ├── Material/       (unused) ✗
  ├── Imagine/        (unused) ✗
  ├── FluentWinUI3/   (unused) ✗
  └── Universal/      (unused) ✗
Packaging: tar.gz, DEB, and the AppImage/FUSE Problem
- name: Package (tar.gz)
  run: tar czf squared-host_linux_amd64.tar.gz -C install .

- name: Package (DEB)
  run: cd build && cpack -G DEB
CPack is CMake’s companion packaging tool. It reads packaging metadata already declared in CMakeLists.txt and produces installers or archives in whatever format you ask for with -G (here, DEB, Debian’s native package format used by Ubuntu and other Debian-based distributions). Both of these are exact commands you’d run locally, unchanged. Nothing CI-specific to configure, because the packaging logic lives in the CMake project, not the workflow file.
The AppImage is where CI diverges from local development. An AppImage is a self-contained, portable Linux application format: one file a user can download, mark executable, and run directly, with no installation step. linuxdeploy is the tool that builds one, bundling the binary and its dependencies together.
- name: Package (AppImage)
  run: |
    curl -sL https://github.com/linuxdeploy/linuxdeploy/releases/download/continuous/linuxdeploy-x86_64.AppImage -o linuxdeploy.AppImage
    chmod +x linuxdeploy.AppImage
    ./linuxdeploy.AppImage --appimage-extract
    mv squashfs-root linuxdeploy-extracted
    rm -rf AppDir && mkdir -p AppDir/usr
    cp -r install/* AppDir/usr/
    mkdir -p AppDir/usr/share/applications AppDir/usr/share/icons
    cp linux/com.squared.app.desktop AppDir/usr/share/applications/
    cp -r linux/icons/hicolor AppDir/usr/share/icons/
    ./linuxdeploy-extracted/AppRun \
      --appdir AppDir \
      --executable AppDir/usr/bin/Squared \
      --desktop-file AppDir/usr/share/applications/com.squared.app.desktop \
      --icon-file linux/icons/hicolor/256x256/apps/com.squared.app.png \
      --output appimage
    rm -rf AppDir linuxdeploy-extracted linuxdeploy.AppImage
linuxdeploy is itself distributed as an AppImage: a compressed filesystem image (SquashFS) with a small runtime stub in front. Running it normally means that stub mounts the filesystem via FUSE (Filesystem in Userspace, a mechanism that lets ordinary programs implement mountable filesystems) before executing anything inside it.
   normal (non-container) run              inside a Docker container
   ─────────────────────────────           ─────────────────────────────
   linuxdeploy.AppImage                    linuxdeploy.AppImage
        │                                       │
        ▼ mounts itself via FUSE                ▼ tries to mount via FUSE
   /tmp/.mount_XXXXX/AppRun                 ✗ no SYS_ADMIN capability
        │                                   ✗ no /dev/fuse device node
        ▼                                       │
     runs fine                              step fails
Mounting a filesystem requires the SYS_ADMIN Linux capability and access to /dev/fuse. Docker containers run with a deliberately reduced capability set, and SYS_ADMIN is excluded precisely because it’s broad enough to let a container reach outside its intended isolation. So linuxdeploy.AppImage tries to mount itself, the container has neither the capability nor the device node, and the step fails.
You could grant the missing capability via the container.options field, but that’s a wider hole than the problem deserves, and it’s brittle. The fix instead: --appimage-extract unpacks the AppImage into a plain directory. Inside sits AppRun, the same entry point the runtime stub would normally invoke after mounting, so calling it directly reaches the identical program without the FUSE step. Everything after that is unchanged: build the AppDir (the standard staging directory layout AppImage tooling expects) from install/, add the desktop file and icons, run linuxdeploy, get an .AppImage back.
If you ever see fuse: device not found in a CI log for any AppImage tool, this is the fix. Extract, then run AppRun directly.
One detail worth knowing: --output appimage writes the finished file to the current working directory, not inside AppDir/. So this step produces Squared-x86_64.AppImage sitting directly at the repo root, ready for the upload step.
Note: Here we are still describing the workflow, and we will get to see the actual files generated later on when we get to run the workflow. Be patient!
The macOS + Windows Job: One Job, Three Runners
macOS introduces a problem the Linux job didn’t have. We need two different Mac binaries, one for Apple Silicon and one for Intel, built the same way, on different machines. Rather than duplicate the job definition, GitHub Actions has a feature built for exactly this: the strategy matrix.
You can think of a matrix as a blueprint for a job that will be replicated once for each combination of values you give it in the include list.
build-desktop:
  strategy:
    fail-fast: false
    matrix:
      include:
        - os: macos-14
          platform: darwin
          arch: arm64
        - os: macos-15
          platform: darwin
          arch: amd64
        - os: windows-latest
          platform: windows
          arch: amd64
  runs-on: ${{ matrix.os }}
In our case, the blueprint has three combinations of os, platform, and arch that we want to build for. runs-on: ${{ matrix.os }} means each combination runs as its own independent instance of this same job. You could have manually defined three separate jobs, but this is cleaner and easier to maintain. The result looks like this:
                       build-desktop (one job definition)
                                    │
              ┌─────────────────────┼─────────────────────┐
              ▼                     ▼                     ▼
        macos-14 runner       macos-15 runner       windows-latest runner
        arm64 (M-series)      amd64 (Intel)          amd64
              │                     │                     │
       squared-host_          squared-host_          squared-host_
     darwin_arm64.tar.gz   darwin_amd64.tar.gz     windows_amd64.zip
                                                    + NSIS installer
Let me rephrase this for those of you new to this concept: strategy.matrix.include lists three combinations, and runs-on: ${{ matrix.os }} means each combination runs as its own independent instance of this same job. We get three runners and three parallel executions of the same steps, each with different values for os, platform, and arch. This is why Windows lives in the same job as macOS even though its steps look nothing alike.
fail-fast: false matters specifically because these are release builds. Without it, GitHub cancels every other matrix instance the moment any one fails, and a Windows-only installer problem would take down both macOS builds you actually needed. With it, all three run to completion independently, and you get whichever artifacts succeeded.
platform and arch aren’t anything GitHub understands natively. They’re custom variables used later to build artifact filenames that describe what’s inside them.
Installing Qt With an Action
Unlike the Linux job’s container, none of these three runners come with Qt pre-installed:
- name: Install Qt
  uses: jurplel/install-qt-action@v4
  with:
    version: "6.8.3"
    target: desktop
    modules: qtshadertools
    cache: true
Notice what’s missing: no if: runner.os == '...' guard. This one step runs identically on all three matrix rows, because jurplel/install-qt-action detects the runner’s operating system itself and fetches the right Qt build for it.
This is also the first uses: step worth pausing on properly, since we’ve used run: almost everywhere else. An action is a public GitHub repository containing a file called action.yml at its root, declaring its inputs, its outputs, and how it runs under the hood: a JavaScript program, a Docker container, or a bundle of ordinary steps given a name. The uses: string, jurplel/install-qt-action@v4, is literally an address: {owner}/{repo}@{ref}. You can confirm this yourself by visiting the action’s repository.
There’s no separate vetted registry behind the scenes. GitHub fetches that exact repository at that exact tag and runs whatever action.yml says. The GitHub Marketplace is just a searchable storefront for discovering actions published this way, not a more-vetted category of them, which is exactly why pinning to a specific tag like @v4, rather than something that can silently move like @main, matters more for a third-party action than an official one.
jurplel/install-qt-action wraps aqtinstall, an unofficial but widely used command-line tool for downloading Qt SDKs, and downloads the actual SDK from Qt’s servers at whatever version you specify. modules: qtshadertools adds Qt Quick’s shader-compilation module, not in the default install set but required here. cache: true stores the downloaded SDK in GitHub’s Actions cache, so a second run with the same version and modules skips the download entirely, saving three to four minutes per run.
macOS: Configure, Build, Package
- name: Install macOS dependencies
  if: runner.os == 'macOS'
  run: brew install ninja

- name: Configure (macOS)
  if: runner.os == 'macOS'
  run: |
    cmake -G Ninja -B build \
      -DCMAKE_BUILD_TYPE=Release \
      -DCMAKE_PREFIX_PATH=$Qt6_DIR \
      -DCMAKE_INSTALL_PREFIX=install
Homebrew (brew) is macOS’s most widely used command-line package manager, and GitHub’s macOS runners ship with it pre-installed. We use it to install Ninja, that the next commands are about to use. The configure command is the familiar Ninja/Release/install-prefix trio, except CMAKE_PREFIX_PATH=$Qt6_DIR reads the environment variable the Install Qt step already set, rather than a hardcoded local path.
Build and Install are the same two lines used everywhere in this pipeline. On macOS, cmake --install produces a .app bundle (macOS’s standard self-contained application package format) rather than a flat tree, because the project sets MACOSX_BUNDLE TRUE. Let’s now look at packaging:
- name: Package (macOS tar.gz)
  if: runner.os == 'macOS'
  run: tar czf squared-host_${{ matrix.platform }}_${{ matrix.arch }}.tar.gz -C install .
Same one-liner as the Linux tar.gz, except the filename is built from matrix variables. This will produce the squared-host_darwin_arm64.tar.gz file on the macos-14, and the squared-host_darwin_amd64.tar.gz file on macos-15.
Windows: MSVC in CI, MinGW Locally
Windows is the third row in the same matrix (same checkout, same shared Install Qt step) but its own steps diverge because of one rule resurfacing from local development: your compiler must match your Qt build.
Locally, MinGW (a GCC-based compiler toolchain for Windows) ships bundled with the Qt installer, so there’s nothing extra to install. In CI, we use MSVC, Microsoft’s own C++ compiler that ships with Visual Studio, instead, for an entirely practical reason: the shared Install Qt step downloads the MSVC variant of Qt by default on Windows. We could fight that and separately install a MinGW toolchain, but MSVC is already pre-installed on GitHub’s Windows runners.
- name: Setup MSVC
  if: runner.os == 'Windows'
  uses: ilammy/msvc-dev-cmd@v1
Unlike GCC or Clang, MSVC’s compiler executable (cl.exe) isn’t reachable from an arbitrary terminal just because Visual Studio is installed. It only becomes usable after vcvarsall.bat, a setup script that ships with Visual Studio, runs in that session and populates PATH, INCLUDE, and LIB. A developer normally launches a “Developer Command Prompt” shortcut that runs this automatically. A CI step has no such shortcut. ilammy/msvc-dev-cmd runs vcvarsall.bat on your behalf and exports its environment variables into every step that follows. If we skip this,cmake -G Ninja will fail to find a working C++ compiler at all.
- name: Install Windows dependencies
  if: runner.os == 'Windows'
  run: choco install ninja nsis -y

- name: Configure (Windows)
  if: runner.os == 'Windows'
  run: |
    cmake -G Ninja -B build `
      -DCMAKE_BUILD_TYPE=Release `
      -DCMAKE_PREFIX_PATH="$env:Qt6_DIR" `
      -DCMAKE_INSTALL_PREFIX=install
Chocolatey (choco) is Windows’s most common command-line package manager, pre-installed on GitHub’s Windows runners the same way Homebrew is on macOS. One line installs both Ninja and NSIS (Nullsoft Scriptable Install System, a tool for building Windows .exe installers). Notice there’s no shell: override here. GitHub’s default shell on a Windows runner is PowerShell, and this step just uses it as-is. That’s why the syntax differs from every other cmake call in this pipeline: a backtick for line continuation instead of a backslash, and $env:Qt6_DIR instead of bash’s $Qt6_DIR.
Now we can shift our focus to packaging. Windows has two different formats, and both are built from the same install/ directory:
- name: Package (Windows portable ZIP)
  if: runner.os == 'Windows'
  shell: pwsh
  run: Compress-Archive -Path install/* -DestinationPath squared-host_${{ matrix.platform }}_${{ matrix.arch }}.zip

- name: Package (Windows NSIS installer)
  if: runner.os == 'Windows'
  run: cd build && cpack -G NSIS
We produce a Windows portable ZIP, which is just a compressed archive of the install/ directory, and an NSIS installer, which is a self-extracting .exe that can create Start Menu shortcuts and an uninstaller. The ZIP is built with PowerShell’s Compress-Archive, while the NSIS installer is built with CPack, just like the Linux DEB package.
Trimming on macOS
Just as we as we saw on Linux, the install directory on macOS contains all the Quick Controls styles, but our app only uses Basic. The trim step removes the unused styles and their compiled libraries, as well as two plugin directories that are not needed in a release build. The result is a smaller, cleaner release package.
Windows shares Linux’s flat install/ layout, so its half is identical to what you already saw. macOS doesn’t, and this difference is why the trim step is more complicated than the Linux one.
- name: Trim install
  shell: bash
  run: |
    if [ "${{ runner.os }}" = "macOS" ]; then
      cd install/Squared.app/Contents/Resources
      for style in FluentWinUI3 Material Imagine Fusion Universal; do
        rm -rf "qml/QtQuick/Controls/$style"
        rm -rf "../Frameworks/QtQuickControls2${style}.framework" \
               "../Frameworks/QtQuickControls2${style}StyleImpl.framework"
      done
      rm -rf ../PlugIns/qmltooling ../PlugIns/egldeviceintegrations
    else
      cd install
      for style in FluentWinUI3 Material Imagine Fusion Universal; do
        rm -rf "qml/QtQuick/Controls/$style"
        rm -f "lib/libQt6QuickControls2${style}"* "lib/libQt6QuickControls2${style}StyleImpl"*
      done
      rm -rf plugins/qmltooling plugins/egldeviceintegrations
    fi
  Linux / Windows layout              macOS bundle layout
  ────────────────────────            ─────────────────────────────────
  install/                            install/Squared.app/Contents/
  ├── bin/                            ├── MacOS/         (binary)
  ├── lib/          ◀── .so/.dll      ├── Frameworks/    ◀── .framework dirs
  ├── plugins/                        ├── PlugIns/
  └── qml/                            └── Resources/qml/
On macOS, the app doesn’t have top-level qml/, lib/, or plugins/ directories. Everything lives inside Squared.app/Contents/: QML under Contents/Resources/qml/, shared libraries under Contents/Frameworks/, plugins under Contents/PlugIns/. The branch cds into Contents/Resources and reaches sideways for the other two.
The library removal can’t reuse Linux’s pattern either, for a reason specific to how macOS packages code. On Linux and Windows, each Quick Controls style is a flat file (libQt6QuickControls2Material.so), so a glob matches it directly. On macOS, Qt ships every module as a .framework directory. No lib prefix, no version suffix, .framework instead of .so. A style there is removed with rm -rf on a named directory, not a glob on a filename.
shell: bash is what makes this step run in Git Bash on the Windows runner instead of its default PowerShell, which is why this step uses for loops and rm while Configure (Windows) right above it used backtick continuation. On macOS, the default shell is already bash, so nothing changes there.
Publishing the Release
Each job uploads its own artifacts directly to the GitHub Release:
# build-linux job
- name: Upload release assets
  uses: softprops/action-gh-release@v2
  with:
    files: |
      squared-host_linux_amd64.tar.gz
      build/squared-*.deb
      Squared-*.AppImage
# build-desktop job
- name: Upload release assets
  uses: softprops/action-gh-release@v2
  with:
    files: |
      squared-host_*.tar.gz
      squared-host_*.zip
      build/Squared-*-win64.exe
softprops/action-gh-release is a community action that creates a GitHub Release for the triggering tag and attaches the listed files. If the release already exists because another job created it first, it adds files to the existing one. That’s how both jobs upload independently without any coordination. First job to finish creates the release, the rest attach to it. So we don’t have issues like race conditions or locking.
Glob patterns (wildcard filename matches, like * standing in for “anything”) absorb the filenames that include matrix variables. squared-host_*.tar.gz matches both macOS archives. squared-host_*.zip matches only the Windows portable ZIP. The macOS runners don’t produce a .zip at all, so that glob simply matches nothing on those runners and the step silently skips it. Same story in reverse for the tar.gz pattern on Windows.
                     GitHub Release: host-v1.2.0
  ┌────────────────────────────────────────────────────────────────────┐
  │  squared-host_linux_amd64.tar.gz     ◀── build-linux              │
  │  squared_0.1.0_amd64.deb             ◀── build-linux              │
  │  Squared-x86_64.AppImage             ◀── build-linux              │
  │  squared-host_darwin_arm64.tar.gz    ◀── build-desktop (macos-14) │
  │  squared-host_darwin_amd64.tar.gz    ◀── build-desktop (macos-15) │
  │  squared-host_windows_amd64.zip      ◀── build-desktop (windows)  │
  │  Squared-0.1.0-win64.exe             ◀── build-desktop (windows)  │
  └────────────────────────────────────────────────────────────────────┘
The result is a single GitHub Release page with seven downloadable files. A Linux user can choose the AppImage, the DEB, or the tar.gz. A macOS user can choose the tar.gz that matches their architecture. A Windows user can choose either the ZIP or the installer.
The Complete Workflow
Putting everything together, you can a full workflow file like the one shown here
Notice something about this whole file: there’s no packaging logic actually in the workflow. The DEB reads CPACK_DEBIAN_* from CMakeLists.txt. The NSIS installer reads CPACK_NSIS_* from the same place. The AppImage step is the same linuxdeploy invocation you’d run locally, with one flag added for the Docker/FUSE conflict. The trim loop is identical to what you’d run by hand after any local install. The pipeline doesn’t invent new deployment logic. It automates the exact solutions already worked out by hand, running them on a schedule instead of at a keyboard. Now let’s see how to trigger the whole thing.
Triggering a Release
Here are the steps you would run locally to trigger the workflow and produce a new release:
1. Run the tests locally. Catch problems before they reach CI.
2. Bump the version. Our projject uses a PROJECT_VERSION CMake variable to keep track of version info in the project. So update it in the root CMakeLists.txt file. That string propagates into the DEB metadata, the NSIS installer version, and every artifact filename CPack generates.
3. Tag and push:
Nothing fancy to do here. We just need to create a new git tag and push it to GitHub.
git tag host-v0.1.0
git push origin host-v0.1.0
The push will trigger the workflow because the workflow is configured to run on push events that create tags matching host-v*. The host-v prefix is a namespace for this particular deliverable, keeping it separate from any other deliverables that might exist in the same repository.
Runner vs. Container: Don’t Conflate Them
It is important to highlight the difference between doing the job directly on the runner and doing the job inside a container on the runner. The Linux job uses a container, while the macOS and Windows jobs do not.
   plain runner                       runner + container
   ─────────────                      ────────────────────
   ┌────────────────────┐              ┌───────────────────┐
   │  ubuntu-24.04 VM   │              │  ubuntu-24.04 VM  │
   │                    │              │  ┌───────────────┐│
   │  your steps run    │              │  │ Docker image  ││
   │  directly here     │              │  │ (Qt included) ││
   │  (no Qt)           │              │  │               ││
   │                    │              │  │ your steps run││
   │                    │              │  │ here instead  ││
   └────────────────────┘              │  └───────────────┘│
                                       └───────────────────┘
The runner is the virtual machine GitHub gives your job. Unavoidable, every job needs one. A container is optional and layered on top. When a job specifies jobs.<job_id>.container, every step in that job runs inside a Docker container on the runner instead of directly on its filesystem. The runner’s job is reduced to hosting Docker. That’s exactly what build-linux does with carlonluca/qt-dev:6.8.3, and exactly what build-desktop does not do, installing Qt as a step instead.
These two ways are available to you and it is up to you to decide which one is more appropriate for your project.
The Takeaway
Every CI step in this pipeline maps to something you’d otherwise do by hand. cmake --install replaces manually copying libraries. The linuxdeploy invocation is the same command you’d run locally, extended with one flag for a container-specific FUSE limitation. cpack -G DEB and cpack -G NSIS are identical to running them at your own terminal. The trim loop is the same cleanup you’d run after any local install.
What changes isn’t the deployment logic. It’s who’s driving. Once this file is committed, releasing a new version stops being a personal fight involving three operating systems and becomes git tag && git push. That’s the entire point of CI/CD: we’re not introducing something new, we’re just automating the same steps we already know how to do.
If you want to see this pipeline built from scratch alongside the rest of Squared’s deployment story (packaging for Windows, Linux, macOS, Android, iOS, and embedded ARM, with proper installers and signed bundles before any of this CI work even starts) I walk through the whole thing in my Qt QML Cross-Platform Deployment course. It’s designed to let you experience live how a Qt application can get to be built and shipped on every platform, and how to automate that process with CI/CD.
Happy shipping!
Qt6 QML For Beginners Book
Master the fundamentals of Qt6 QML development with this comprehensive 400+ page guide. Learn declarative UI programming from scratch with real-world examples and cross-platform development techniques.
Qt6 QML Advanced - C++ Integration
Take your Qt6 QML skills to the next level with advanced C++ integration techniques. 350+ pages covering QML-C++ integration, performance optimization, and advanced patterns for production-ready applications.

Desktop Apps with Qt Widgets and C++
Master professional desktop application development using Qt Widgets and modern C++. 40+ hours of content with 5+ real projects. Perfect for beginners to intermediate developers.
Desktop Apps with Qt Widgets and PySide6
Learn to build powerful desktop applications using Qt Widgets and Python. 35+ hours of hands-on content with 4+ real-world projects to boost your Python GUI skills.
Qt QML From Beginner to Pro
Master modern UI development with Qt QML and Qt Quick. 50+ hours of comprehensive training with 6+ real projects. Build fluid, dynamic interfaces for desktop, mobile, and embedded devices.
Multi-Threading and IPC with Qt C++

Harness the power of multi-threading and inter-process communication in Qt. 8-12 hours of intensive training with 6+ hands-on demos. Take your Qt C++ skills to the next level.